"When I was approached by Voxel School to be a part of the Advanced Weapons and Vehicles course's teachers group, I knew I was up for a big challenge. I'm a hard surface artist in essence, so I wasn't particularly worried about my modelling skills, but I knew something was changing when it came to producing really high-quality weapon assets - the workflow.
A small disclaimer tho. I taught the class among other teachers who were responsible for other areas of the course, like vehicles or general hard surface techniques. I was going to be responsible to teach the main branch, which focuses on the regular development of a weapon asset, from modelling to texturing and presentation. Always eager to learn new techniques, my first reaction was to look into how my role models in the weapon art industry were developing their pieces lately, and so I ultimately came across Duard Mostert's Artstation Learning course, Fusion 360 for Games. It was after finishing the course when I knew I had to give my new students this new and pioneering approach to 3D art.
I must admit my first few days in class were a bit all over the place. I had been using Fusion 360 for a couple of weeks tops, but I wasn't going to let that decide the future of the 25 people I had in front of me, so I started the process of teaching them while I was also discovering this amazing workflow. Here's how I did it."
This post will contain many quotes from my previous post - Wilcox Boss 300 - Mentor Project Breakdown.- Like the one above.
Not much has changed in the past 3 months. I am still pretty new to Fusion 360, and I still hold a tremendous passion for teaching, despite the minor road bumps we had to face together, my students and I. For this second part of the course, I wanted to take on a fully customizable piece that allowed me to demonstrate how to tackle certain materials that were a bit less common in modern guns. At the same time, I was a bit tired of the "copy everything to perfection" dynamic that I was starting to enter in my weapon art journey, so being creative was a must for this project.
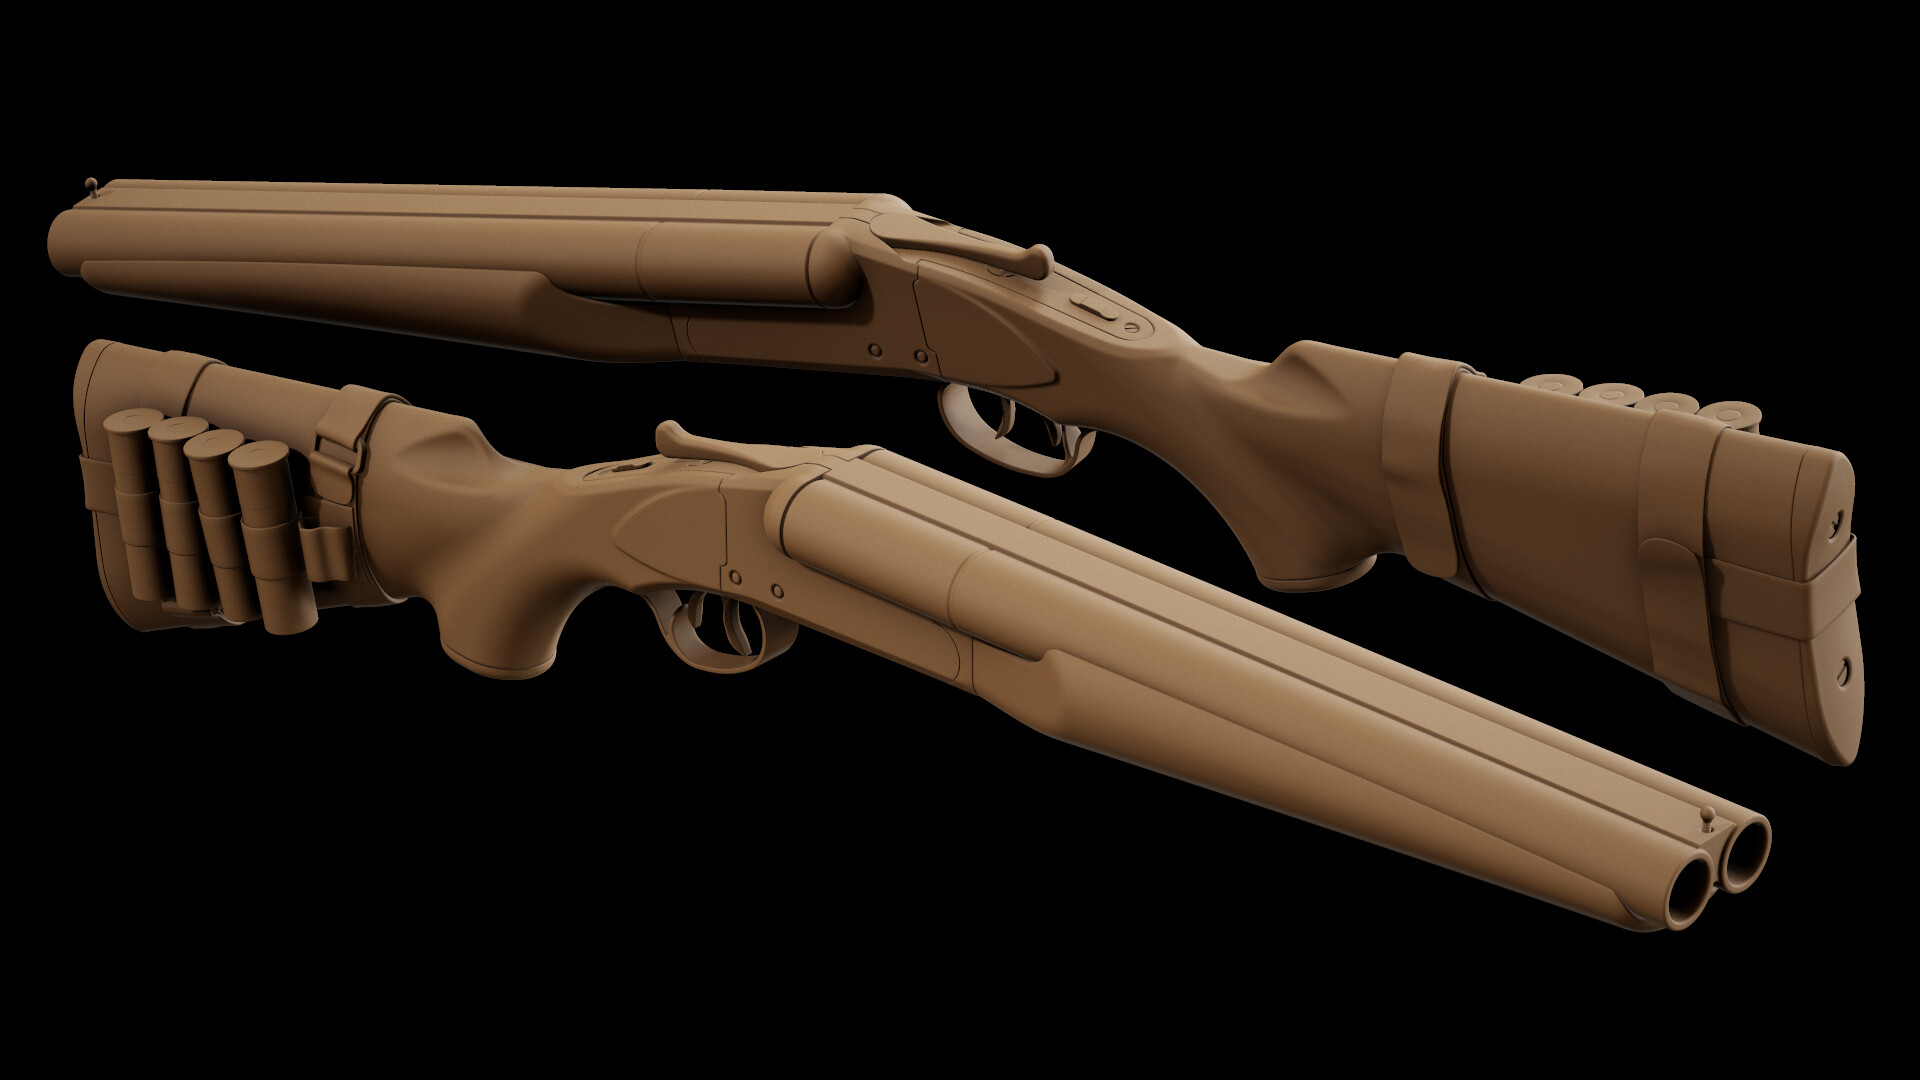
For this very reason, I had to choose something out of the ordinary. I always loved to add some storytelling elements to my pieces, and to me, there are few things better to find good stories than to watch a movie related to the subject I'm looking to cover in my next piece. Long story short, I ended up watching the movie "Killing them Softly", which contained a very funny sawn-off shotgun.
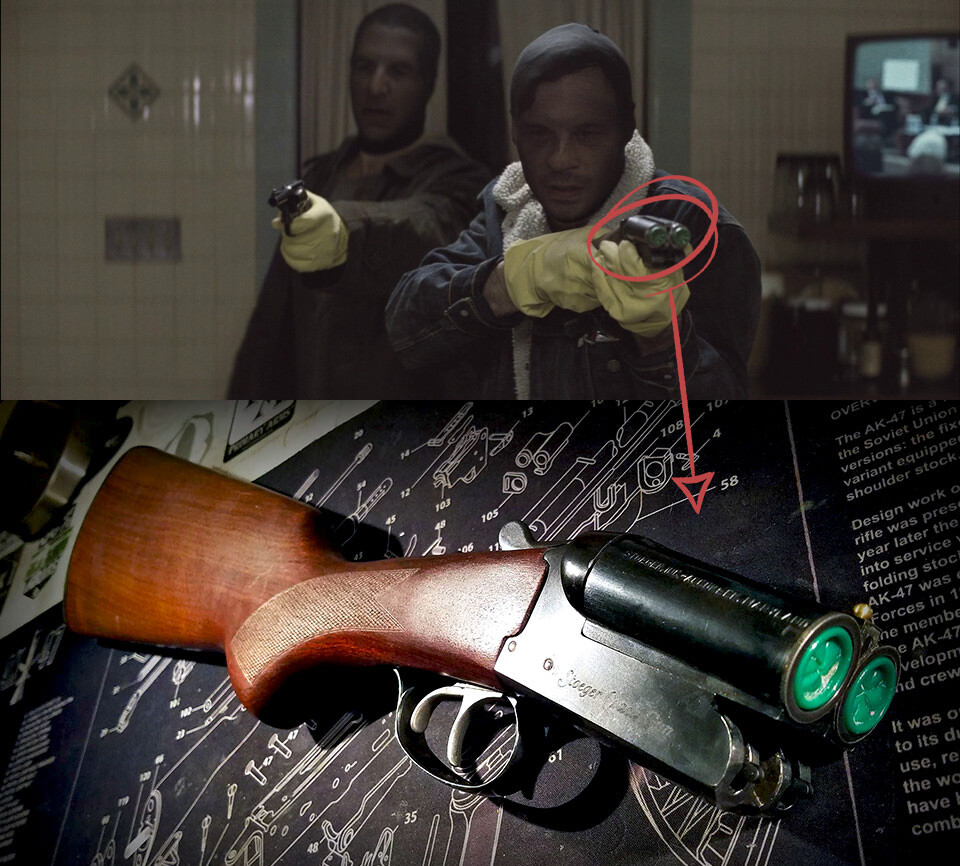
There I had it, my next piece. You may notice some of the shots from the project have nothing to do with such a short version of the gun. I'll cover the reason for those variations in the following sections. Enough context, let's get on with the breakdown.
Modelling Organic Shapes in Fusion 360.
My first challenge for this model was to try and continue the class workflow, which meant getting the high poly model made in Fusion 360 with the same methodology I described in my past article:
"Sketch, Extrude, Combine. Rinse and Repeat.
Modelling in Fusion can be a pain in the bum at first, but it quickly turns into a fast and clean modelling package. Using the most basic tools, like "Create Sketch", "Extrude" and "Combine", will take care of 90% of the operations we had to make in order to form this base model. "Move/Copy" allows rotations too, so that took care of the other 10%. As time passed, we all started discovering more ways to use these tools together, separately, combined with new ones... you get the idea. After our second week, I can comfortably say we were using Fusion as if it had been part of our toolset for ages."
Hard surface modelling in Fusion isn't really greatly challenging anymore after we completed our first piece. As I mentioned before, Fusion was really easy to pick up for us, or at least that's what I thought. Organic shapes are a whole different story (kind of), and they presented a new challenge for us to solve. I still wanted to make as much as I possibly could inside of Fusion 360.
Without tools like TurboSmooth or subdivision to round up any organic shapes as you would do in traditional SubD modelling, we were bound to manually round and generate every single curve we needed in the model. This ended up being extremely easy, as we figured we only had to control the way we wanted our sharp corners to be rounded via fillets. Below is a rough video of the process.
A quick demonstration of the steps taken to build the stock.
The result is pretty rough, I'm not going to lie, and being my first organic model, surely there are steps that can be done in a more optimal way, and get them to look cleaner. Honestly? I trust my process enough to know this will make for a great high poly once properly processed.
After kind of doing the same for all the pieces in my reference, I started to get something that I loved.
But there was something up with this model... I don't know if it was just me, but the model felt weirdly balanced. Too much weight in the front and no action in the back? That bothered me but my brain had already started to oversaturate with these model.
Asking for Feedback - The Decisive Turning Point.
I am not very used to asking feedback for my portfolio models, let's be honest, but this time I wanted to do something about it, and I can't be happier that I did. My friend Barkin Eraslan, or EliteDoughnuts as some people may know him, has been basically my second creative input, apart from my own. I can't thank him enough for his effort to help me push this one further.
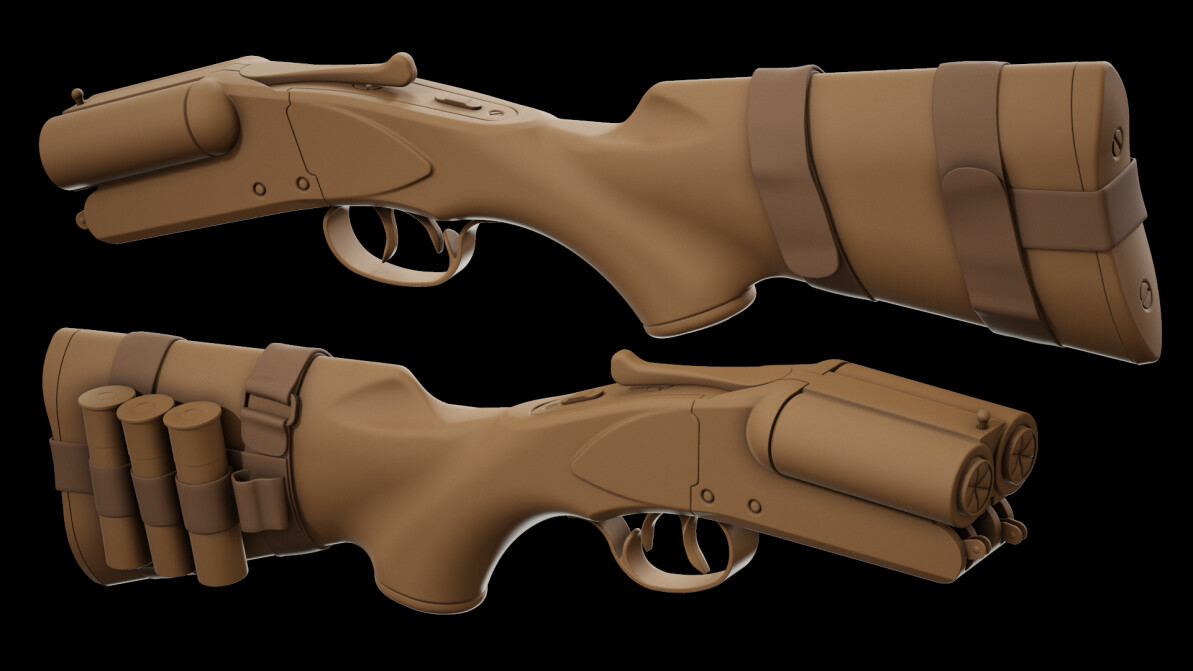
After asking him, we came to the conclusion that it was going to be important to add some sort of attachment to the back of the model, so he came up with the idea of an ammo holder. Just brilliant.
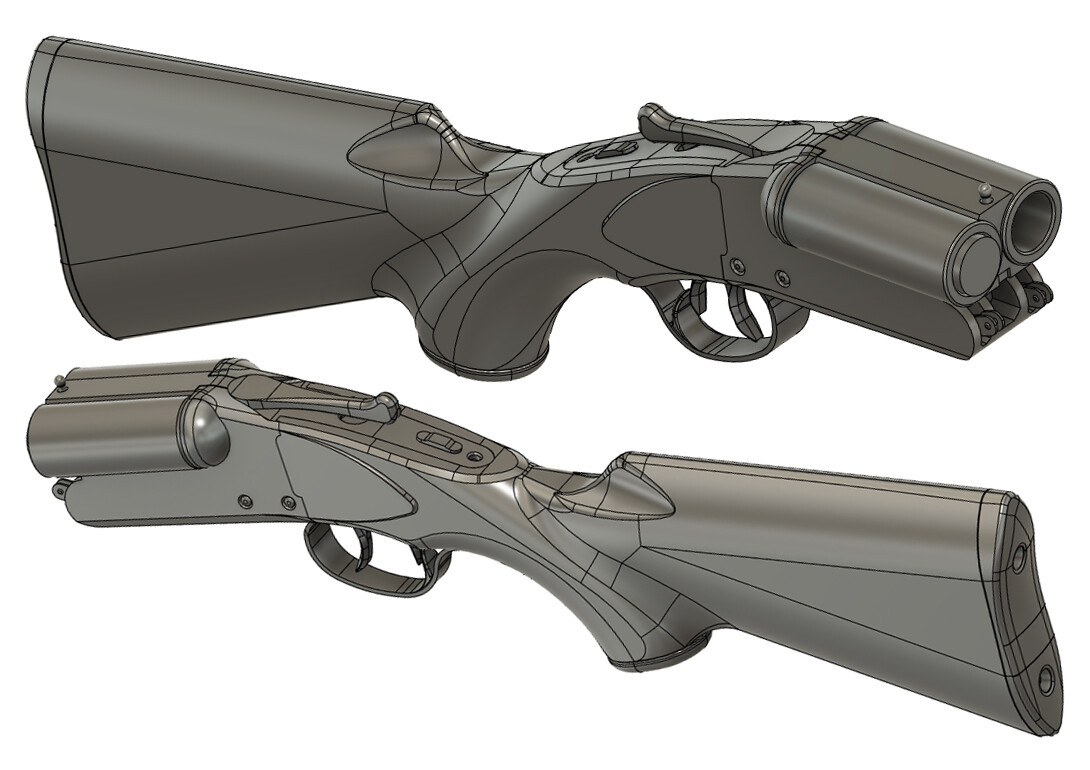
Now the model feels interesting at least, but there's still something way off. As much as I'm trying to adhere to the reference, I really don't love the proportions of my model, so I decided to expand the thinking power on it by posting the image to the DiNusty Empire Discord. Tomas Tagesson and Martino DB had the brilliant idea to add a long barrel variation, which ultimately led to the idea of making the shotgun modular. But first, I had to try the new look, so I quickly put the longer barrel + forearm together in Fusion.
This is what I'm talking about. This now feels much, much better. Asking for that extra opinion really solved the problem that I had. I can't be happier that I stepped out of my comfort zone and asked for feedback, which I understand, it's a very scary thing to do, even when you are used to it day after day in the production environment.
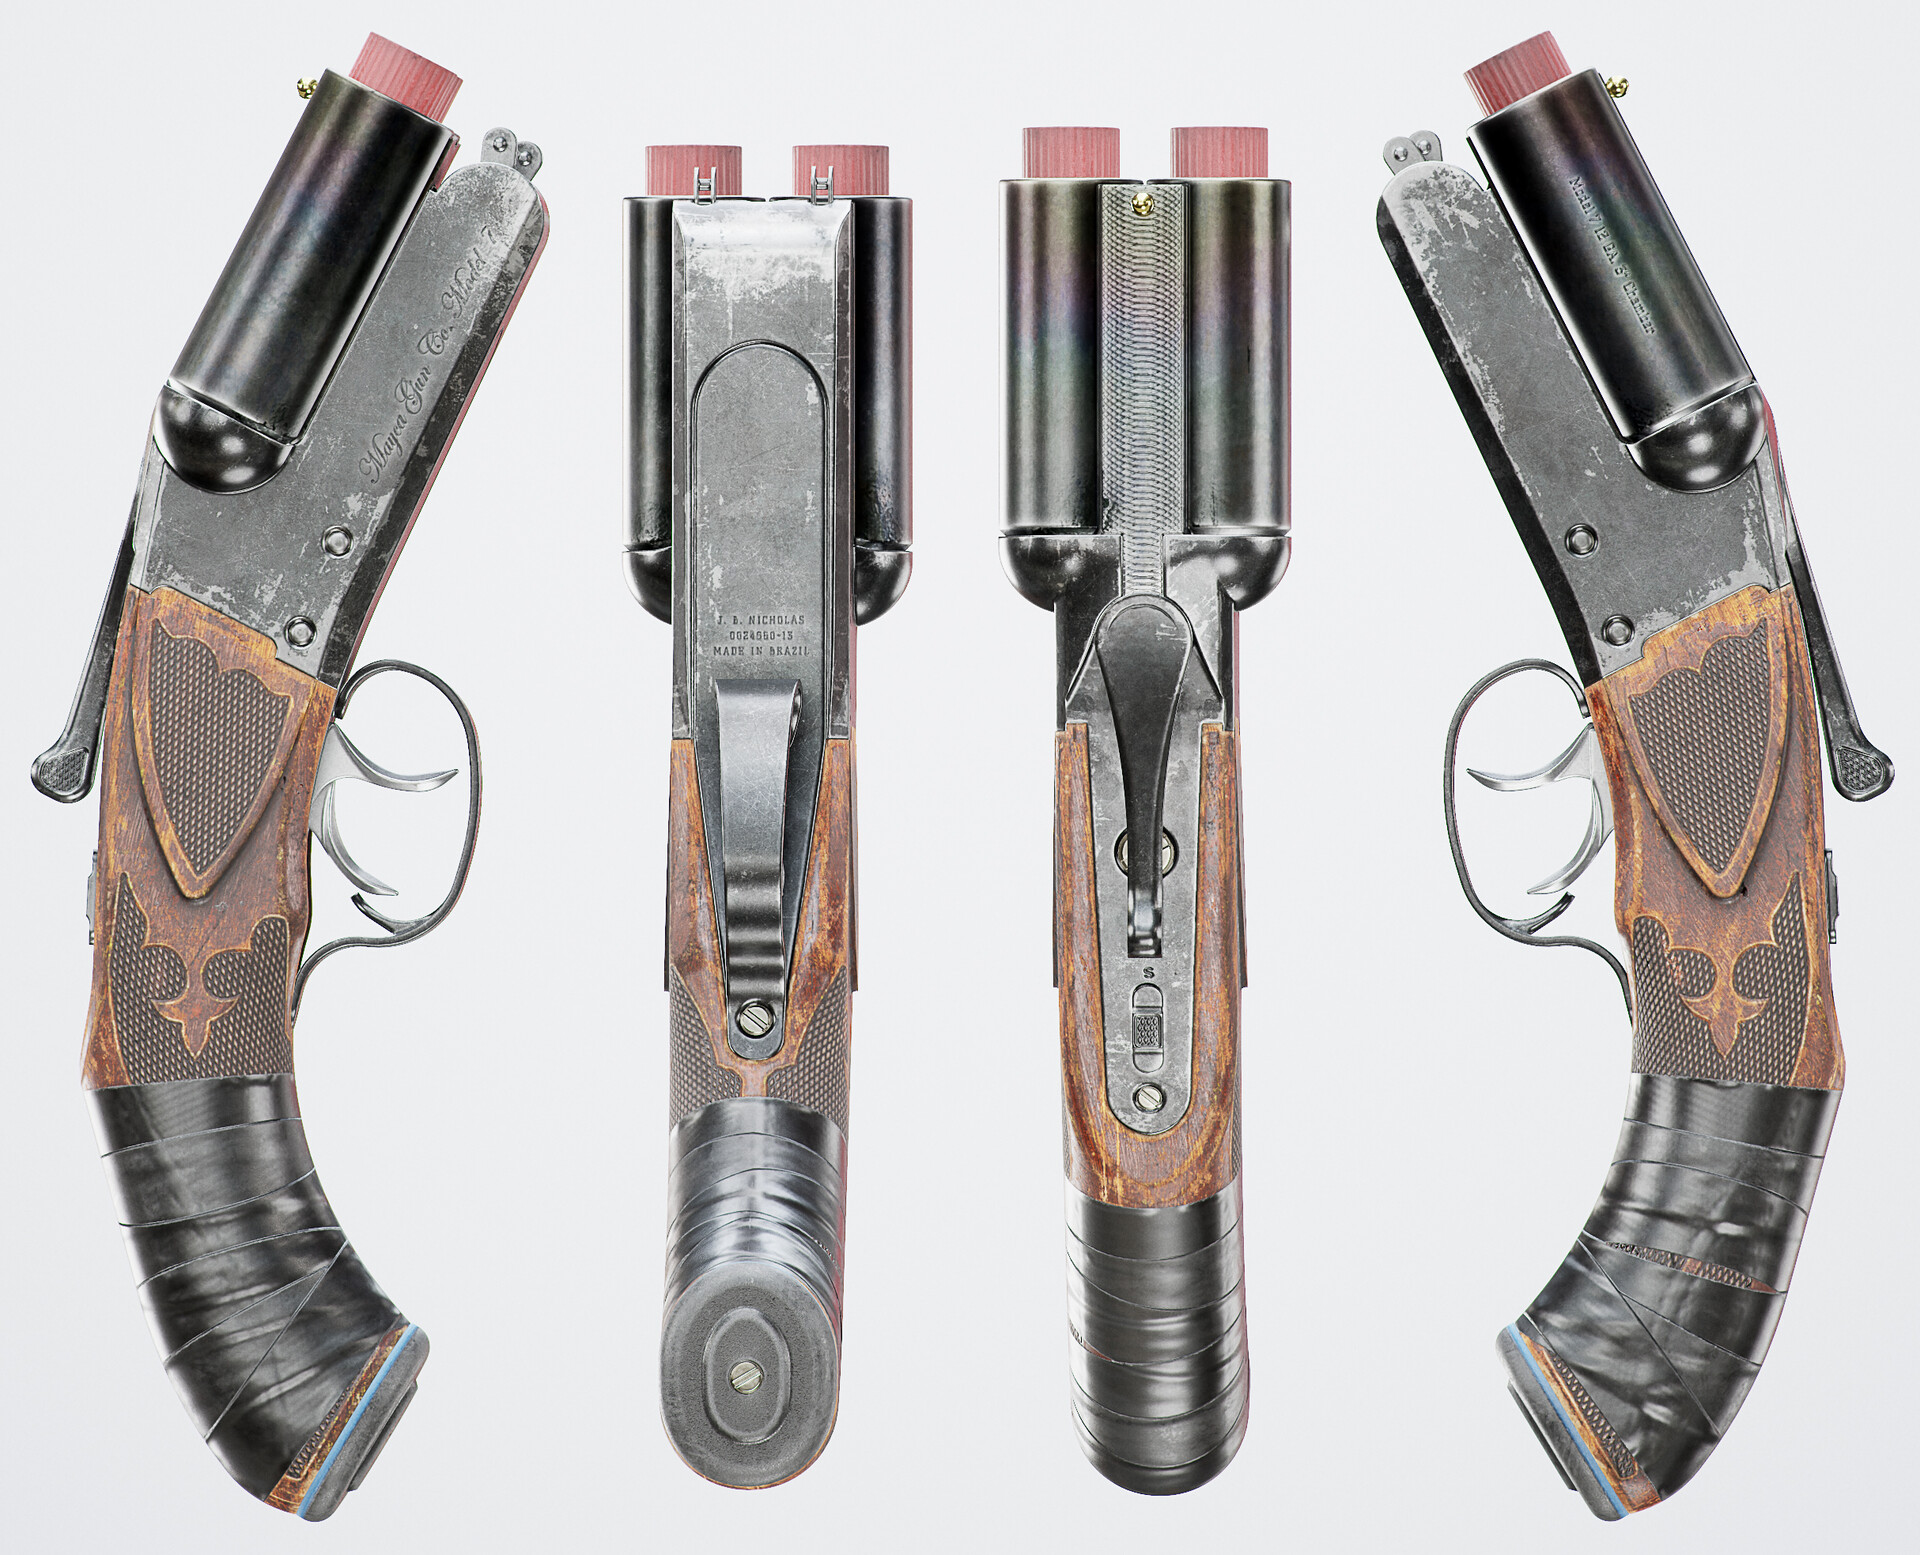
As mentioned before, because of this feedback, I ended up generating the shorter stock variation too, which led to 5 or 6 different combinations when you take the ammo carrier into account.
High and Low Poly Polishing, UVs, and Baking - Kind of the Same Story.
This model wasn't much of a challenge when it came to rounding the edges, optimising or baking. My Wilcox Boss 300 breakdown really sums up all the process really well, so if you want to understand the process better, I suggest you take a look at it - Linked Here.
I will quote the parts that are most relevant for this asset, just in case you don't want to be navigating from one post to the other. I won't be copying the images over tho, so if you want to see specific results for the quoted text, I'm afraid you'll have to check the other article.
After exporting our meshes from Fusion or Moi, depending of the following:
"Moi is great at taking the solids created in Fusion and converting them to whatever mesh configuration suits you best, but, since I didn't have this available for me, I had to learn a way to export some reasonably dense meshes from Fusion so that I didn't end up with faceted results in Zbrush, since Zbrush won't care about your smoothed faces, and will calculate your Dynamesh only minding your geometry, giving you incorrect results for your high poly...
...Without Moi, we had to be clever about this. Thankfully, Fusion allows for a higher subdivision count, although it's quite finicky and requires a fair amount of playing around, and some levels can break your model. Again, not as straightforward as Moi. The following export settings, plus some playing around in Zbrush, allowed us to get a great-looking high poly."
Once our meshes are exported from Fusion, or Moi, it's time to process the meshes.
"First, we Dynamesh, then mask by smoothness, which selects only the hardest edges, refine that mask with blurring and sharpening, polish the unmasked areas, unmask, and polish crisp edges on the whole object. This gives us a clean and smooth high poly.
As you can see, we were able to work around not having Moi for now, and we could end up with a fairly clean high poly. Zbrush is quite powerful when it comes to processing the geometry, and it wasn't like we had to make some crazy process to make this work for us. It is now that we are moving on to the low poly that we are going to suffer the consequences of not having the software."
That's it for the high poly. Quite simple once you get used to it. As per the low poly, the following sums up our process pretty well:
"Luckily for us, there's a great article here in Artstation Magazine on how to work with Fusion and Moi, which I was able to share with my students, which contains the following video explaining how you should export your models from Moi."
Here's a link to the aforementioned article.
"I must admit I couldn't treat all the pieces in the model with all the love I would have liked to due to the considerable time constraints I was under. At the end of the day, I had to be very careful on where I spent the resources I had, keeping in mind my students were not starting this course with a zero knowledge base. Let's not forget this was an advanced course.
The next step was Smoothing Groups and UVs. It is incredibly important to get the first one right. Once we have good smoothing in our object, unwrapping is just a matter of a few clicks...
...I start with flattening all the UVs, then I break them by smoothing group, cut the necessary areas, relax them and organize them properly to complete the process. Pretty simple. Once I have done this for every piece of the model, all is left is to pack them by groups using RyzomUV, with one group per piece."
And for baking, not much really. Take the objects into Marmoset with proper naming, make sure your UVs and Smoothing are correct, that your highs and lows match well, and you pretty much are ready to go. Marmoset has a great article explaining how to bake normal and ambient occlusion maps, so if you want to learn more about it, please give it a read! - The Toolbag Baking Tutorial.
I guess the only thing that I want to emphasize is that I don't want to marry with the details in the high poly stage. I usually bake the edges only and leave any surface details or patterns for substance Painter. Let's take a look at a few of the layers that build the various details that I wanted for my model, like the checkering.
Detailing the Bakes - A Feedback-Proof Approach.
A feedback-proof approach? What does that mean? During my many years in production, I've gathered one piece of knowledge that has saved me from numerous headaches. The more you leave to the final step, texturing, the least you will have to go back and repeat. For example, if I added the checkering in the high poly and then found out that I don't like the pattern while rendering, I'd have to go back to the high poly stage and fix the patterns. If this was done in the texturing phase, just a few changes would be required to solve the problems in my model.
I try to live by that, so this model wasn't going to be made different. Everything that isn't shading or smoothing is not baked but added as a layer in my height channel in Substance Painter. This requires a good mask, which I'm much comfortable doing in Photoshop, using the pen tool.

Very roughly you can see what ultimately ends up being the mask that defines where my checkering will be. Once imported into Substance Painter, I apply the alpha using a planar projection, which allows me to ensure the mask is cleanly placed where I want it to be. This, plus some filters, more specifically blur and levels to create nicer and cleaner edges, and some painting using the Lazy Mouse to fix what I couldn't get right with just the projection is what ends up being the basic mask for the patterns.
By further processing the masks, I am then able to create the "staired" indents that not only add further detailing, but also help with the depth of the patterns.
As you can see, not a ton of complexity here, just layer over layer to achieve the look I'm after. After doing this across the entire model, caring for each detail, I end up with my "Detailed Bakes" that I can later on export and import back as the new normal maps to bake my details from.
Another great example, in my opinion, of bake detailing that works very well is tape. In the following images, you can see how I layered square masks one on top of another with a passthrough blur to achieve thickness on the tape by blurring what is below.
It might not look like much but with the right materials applied it starts to grab a lot of depth information, which ultimately helps me nail the materials (as much as time allowed me to at least). Here's a hopefully better explanation of what I'm doing.
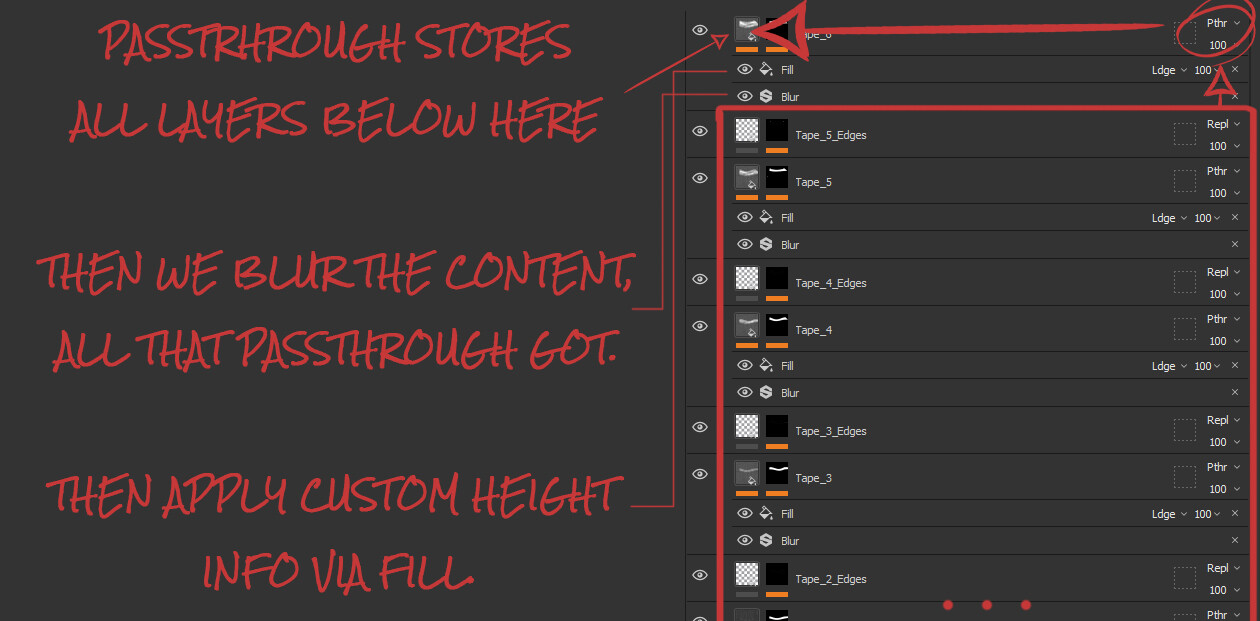
This way, it is easy to store all the layer's height information so that we can further process it, creating the illusion of tape not being able to stick to the crevices of our detail, forming that softened bumpiness and a blurrier line where the tape overlaps other tape's borders.
Texturing - Another Feedback-Rich Step.
"My texturing process is quite standard. I build layers of base materials that just work well with each other. I look for contrast in their roughness without adding too much noise and play with the color variations of the objects..."
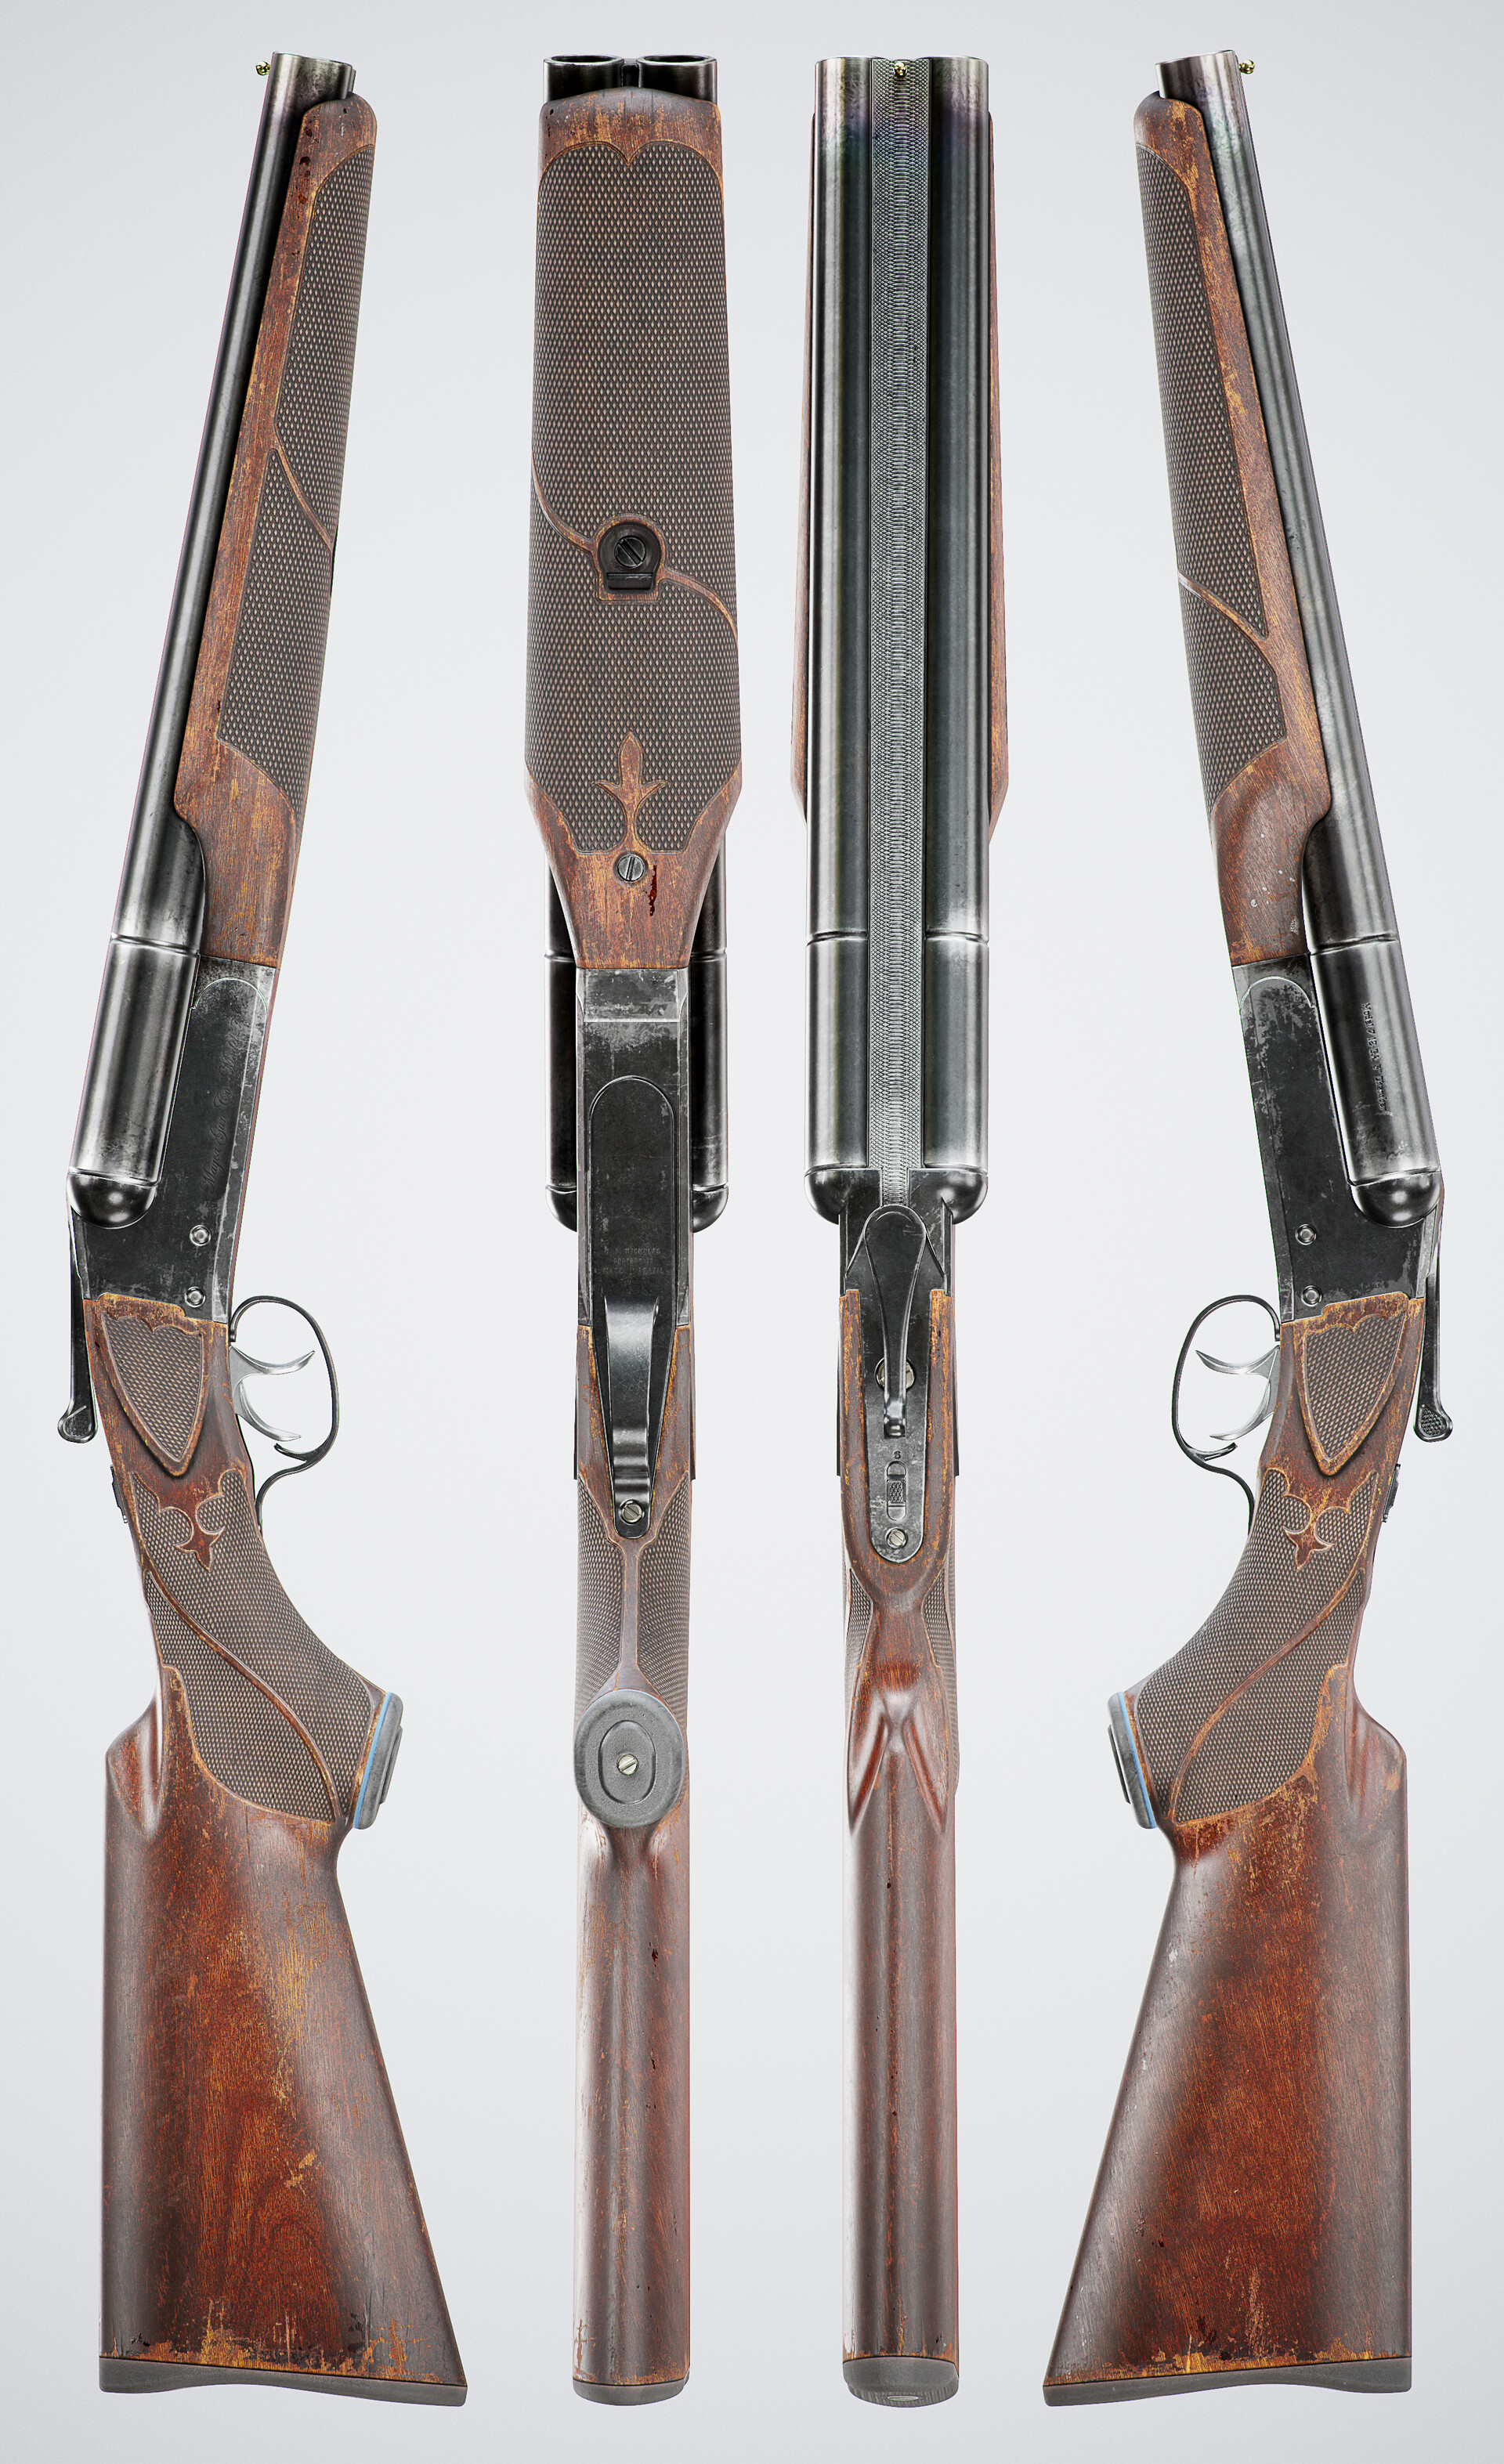
Well... While this still applies to this model, I just had to be a ton more creative on how I wanted to create the materials for this piece. If you look at my other portfolio pieces, none of them include wood, and while texturing is not my strongest point, I was somewhat confident that I could teach my students how to tackle this community-loved material.
I have lost count on how many times I've recommended this tutorial. Substance Painter: Pushing Your Texturing Further by Jason Ord is one of the best texturing tutorials out there. I picked some of the ideas from it, but the most important one was to use a Megascans texture as the base for my wood. Placing it with a very carefully set up tri-planar projection, and playing with the levels and color corrections gave me an incredibly solid base to work from.
I only used the albedo from Megascans, and created my own roughness for it, by desaturating it and playing with its levels.
For the damage, I used the main wood material with some filters on it to create a more vibrant but less elegant variation of the wood, sort of rougher looking, as it should be. I really wanted to play with its colors a bit and not just desaturate it a bit to make it look older, or your usual perception of worn, there had to be a bit more to it than that.
I decided to divide all my damage layers into several, depending on the technique I was using to apply them. There are three main layers, the "generated" layer, the "placed and alpha via tri-planar" layer, and the stencil drawn layers. They are all then anchored and applied to a layer that controls color and roughness via a passthrough with filters, to give the look I'm describing above.
As you will see, all layers have to work with each other, and some even accentuate the look of the previous one, masking out rough spots from the generator, for example.
The same story goes for the metal, actually, exactly the same steps, but making sure they would fit my references for metal except for the ones for wood.
Overall, the metal in these guns feels a bit brushed, so generating those effects was quite easy. Other than that, Stan Brown pointed out a super cool effect for surfaces, Faceted Normals by Ben Redmond, which gives it the nice broken-up surface look that the metals usually have. The effect below is VERY exaggerated and just done to showcase what it does.
If you look at it, it's not really acting like a roughness map, that blocks light. This one is acting on the normals, by altering the direction the light bounces back at the camera. This way you can create very nice surfaces that don't require a strong light source to allow them to represent their details, if that makes sense.
And below, the same grayscale map is applied as a Roughness map:
As I mentioned, Roughness is a much stronger - lighting-based detailing method, while Faceted Normals provides a better solution for a softer variation based on either softer lighting or ambient lighting.
For the cloth, a very similar approach to the wood was taken. The stitches are generated using the "Auto Stitcher" generator in Substance Painter. It really helps a ton to place lines and whatever stitch-like detail you might need to place. Not much to add there I believe.
With all that, my texturing was pretty much done. If I haven't broken down any specific for certain materials, it's pretty much because it falls into my previously written rules. It's either layer on top of layer via generators, a plain texture altered with some levels and hue, saturation, and lightness filters, or it's just the same as the two I described, which I pointed out already.
On a different note, the title of this part is very descriptive of what the process looked like for this asset. At first, I wanted to go for a much cleaner look, and considered my asset as done way before I started adding all the little details you can see on the final renders. As I mentioned a couple of sections ago, feedback on this project was a completely crucial part.
This is why I'd love to thank Barkin Eraslan for his feedback on modelling, textures and rendering, Tomas Tagesson and Martino DB for their feedback on the high poly, and Jason Ord, Rick Greeve and Stan Brown for their feedback on textures and rendering. They were all amazingly useful, and even took the time to make super cool paint overs and feedback sheets for me to apply. You all rock!!
If you want to see more shots, feel free to check the artwork's page. It is now time to say goodbye for now, thank you for reading, and feel free to leave a comment below with your thoughts or questions!