When I was approached by Voxel School to be a part of the Advanced Weapons and Vehicles course's teachers group, I knew I was up for a big challenge. I'm a hard surface artist in essence, so I wasn't particularly worried about my modelling skills, but I knew something was changing when it came to producing really high-quality weapon assets - the workflow.
A small disclaimer tho. I taught the class among other teachers who were responsible for other areas of the course, like vehicles or general hard surface techniques. I was going to be responsible to teach the main branch, which focuses on the regular development of a weapon asset, from modelling to texturing and presentation.
Always eager to learn new techniques, my first reaction was to look into how my role models in the weapon art industry were developing their pieces lately, and so I ultimately came across Duard Mostert's Artstation Learning course, Fusion 360 for Games. It was after finishing the course when I knew I had to give my new students this new and pioneering approach to 3D art.
I must admit my first few days in class were a bit all over the place. I had been using Fusion360 for a couple of weeks tops, but I wasn't going to let that decide the future of the 25 people I had in front of me, so I started the process of teaching them while I was also discovering this amazing workflow. Here's how I did it.
-----
Sketch, Extrude, Combine. Rinse and Repeat.
Modelling in Fusion can be a pain in the bum at first, but it quickly turns into a fast and clean modelling package. Using the most basic tools, like "Create Sketch", "Extrude" and "Combine", will take care of 90% of the operations we had to make in order to form this base model. "Move/Copy" allows rotations too, so that took care of the other 10%. As time passed, we all started discovering more ways to use these tools together, separately, combined with new ones... you get the idea. After our second week, I can comfortably say we were using Fusion as if it had been part of our toolset for ages.
There were some great resources that aided me when it came to learning Fusion myself, but I want to give special credit to two YouTube channels/videos in particular - Duard Mostert's YouTube Channel (As you will see during this article he's our main source for Fusion Learning content), that together with 3D Gladiator's LEARN FUSION 360 FAST! A Beginner Tutorial video form a super helpful collection for Fusion360 begginers.
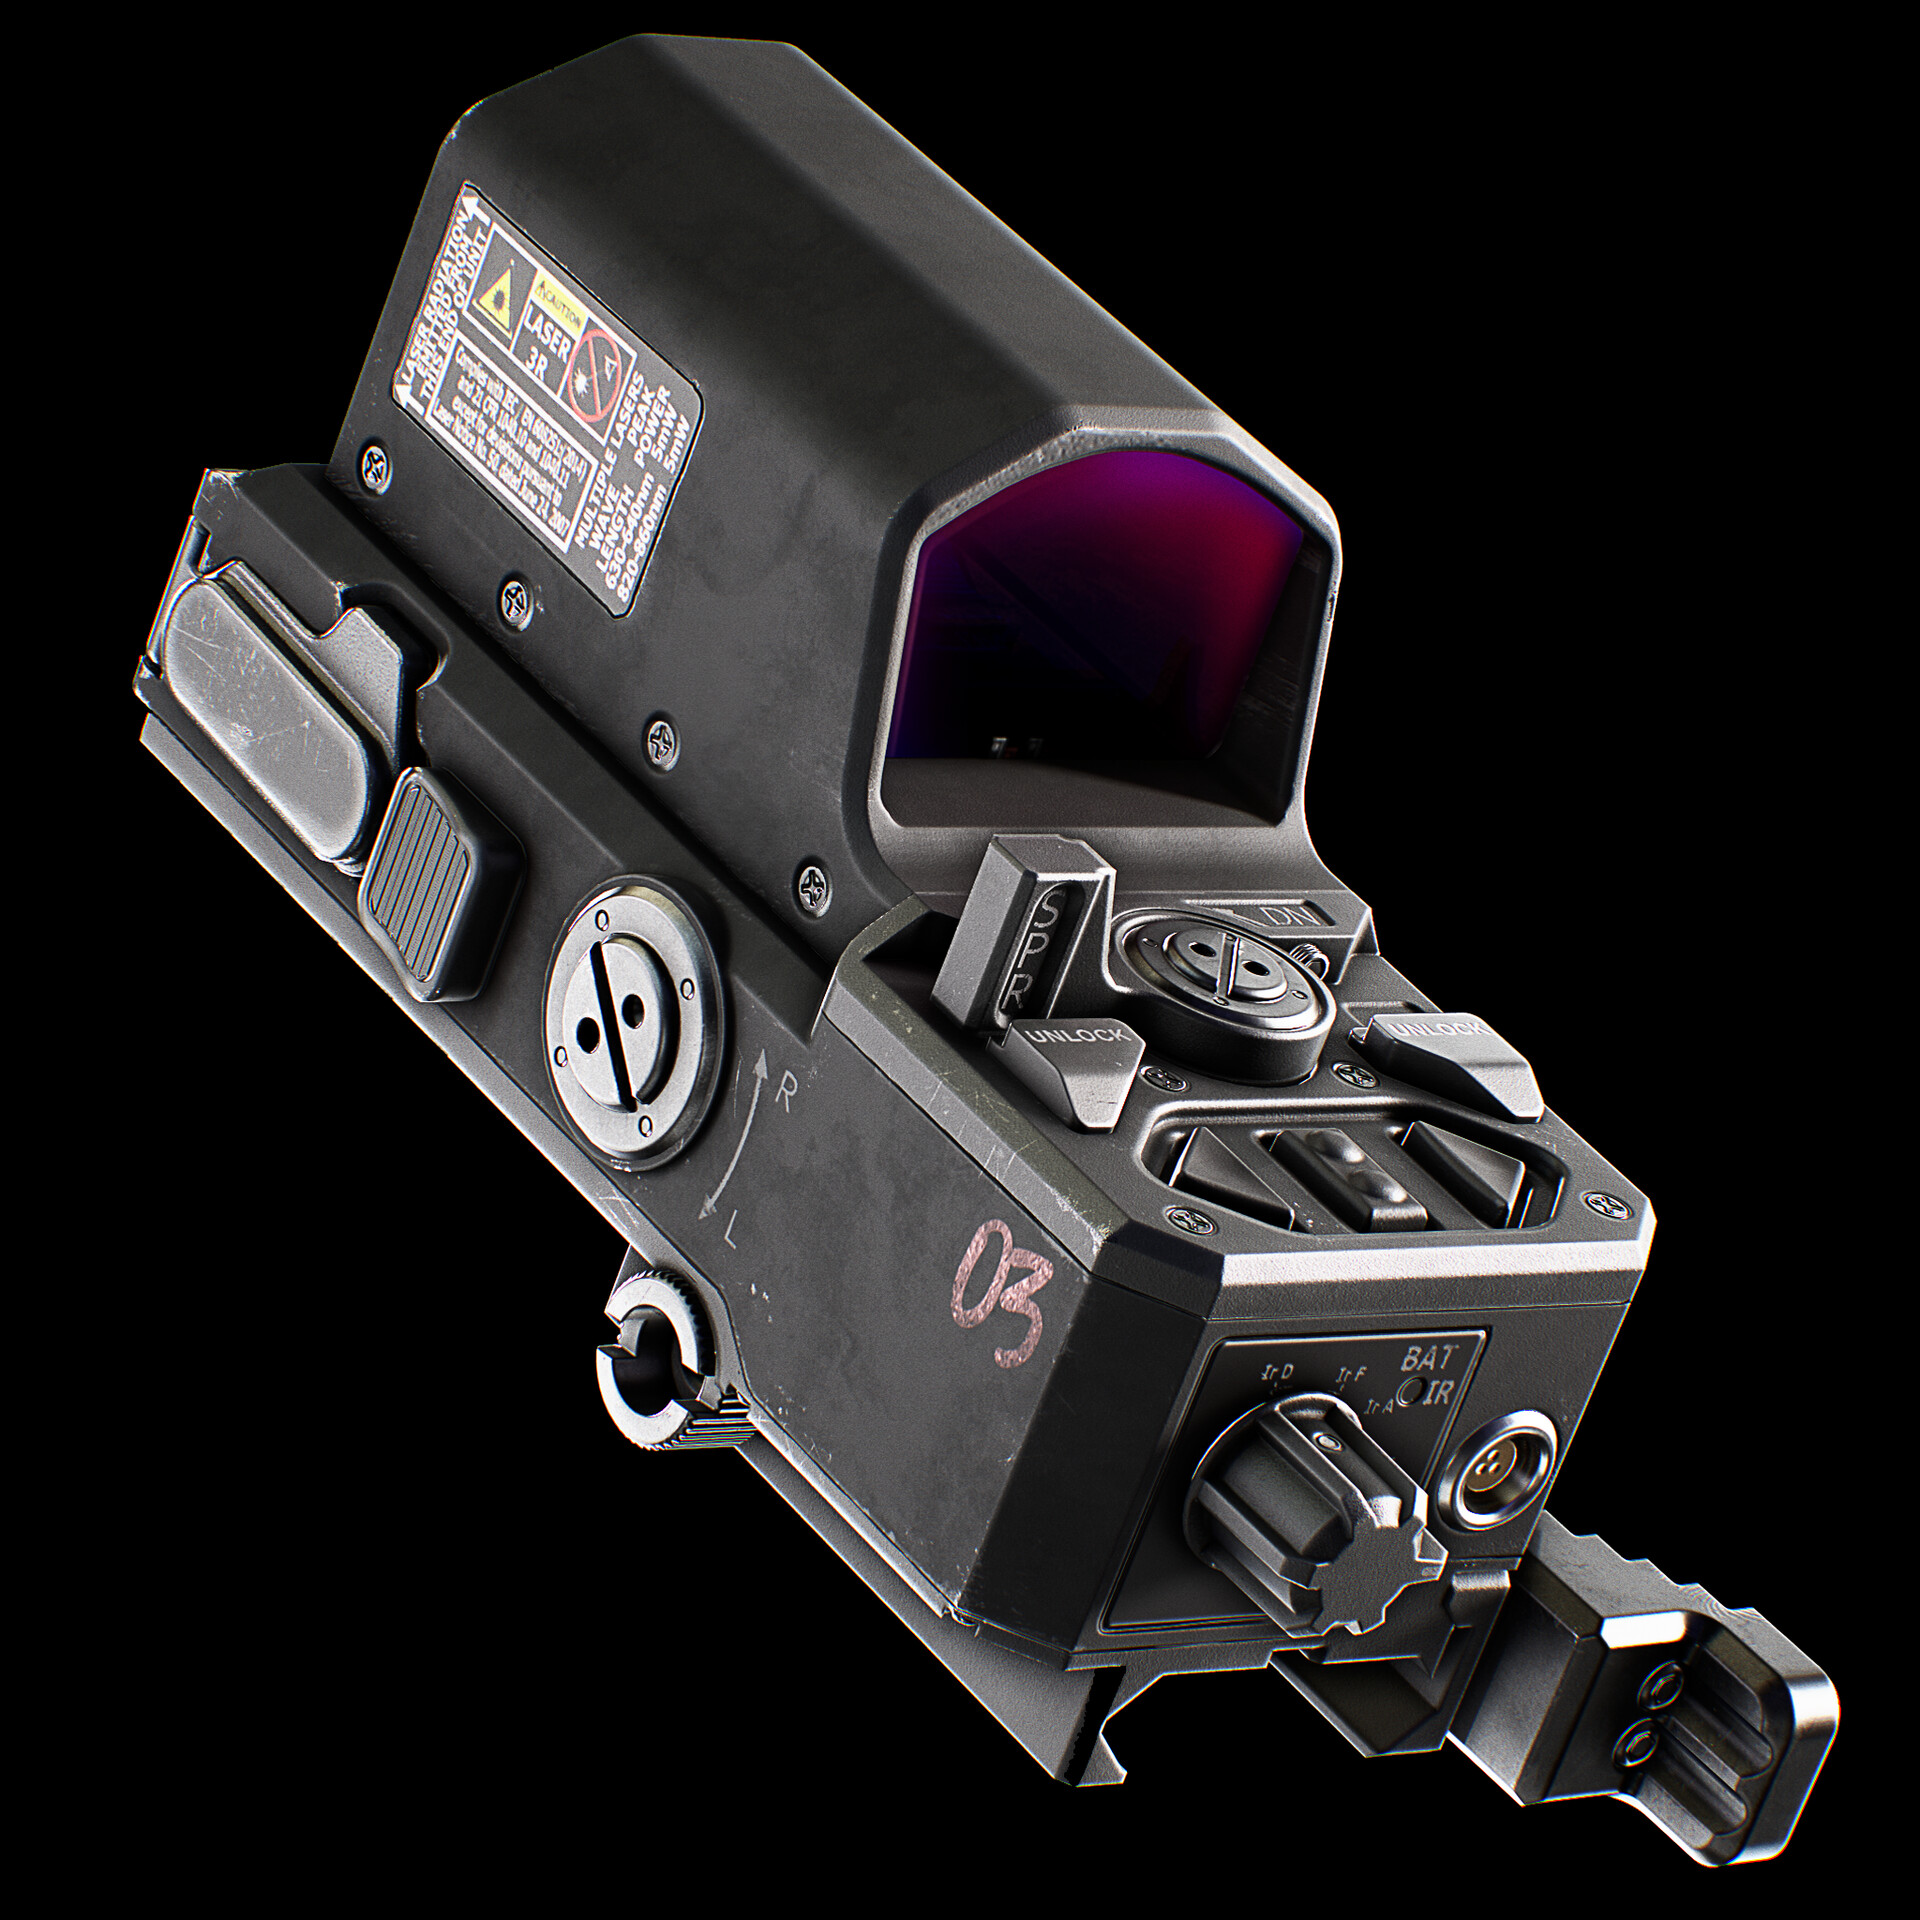
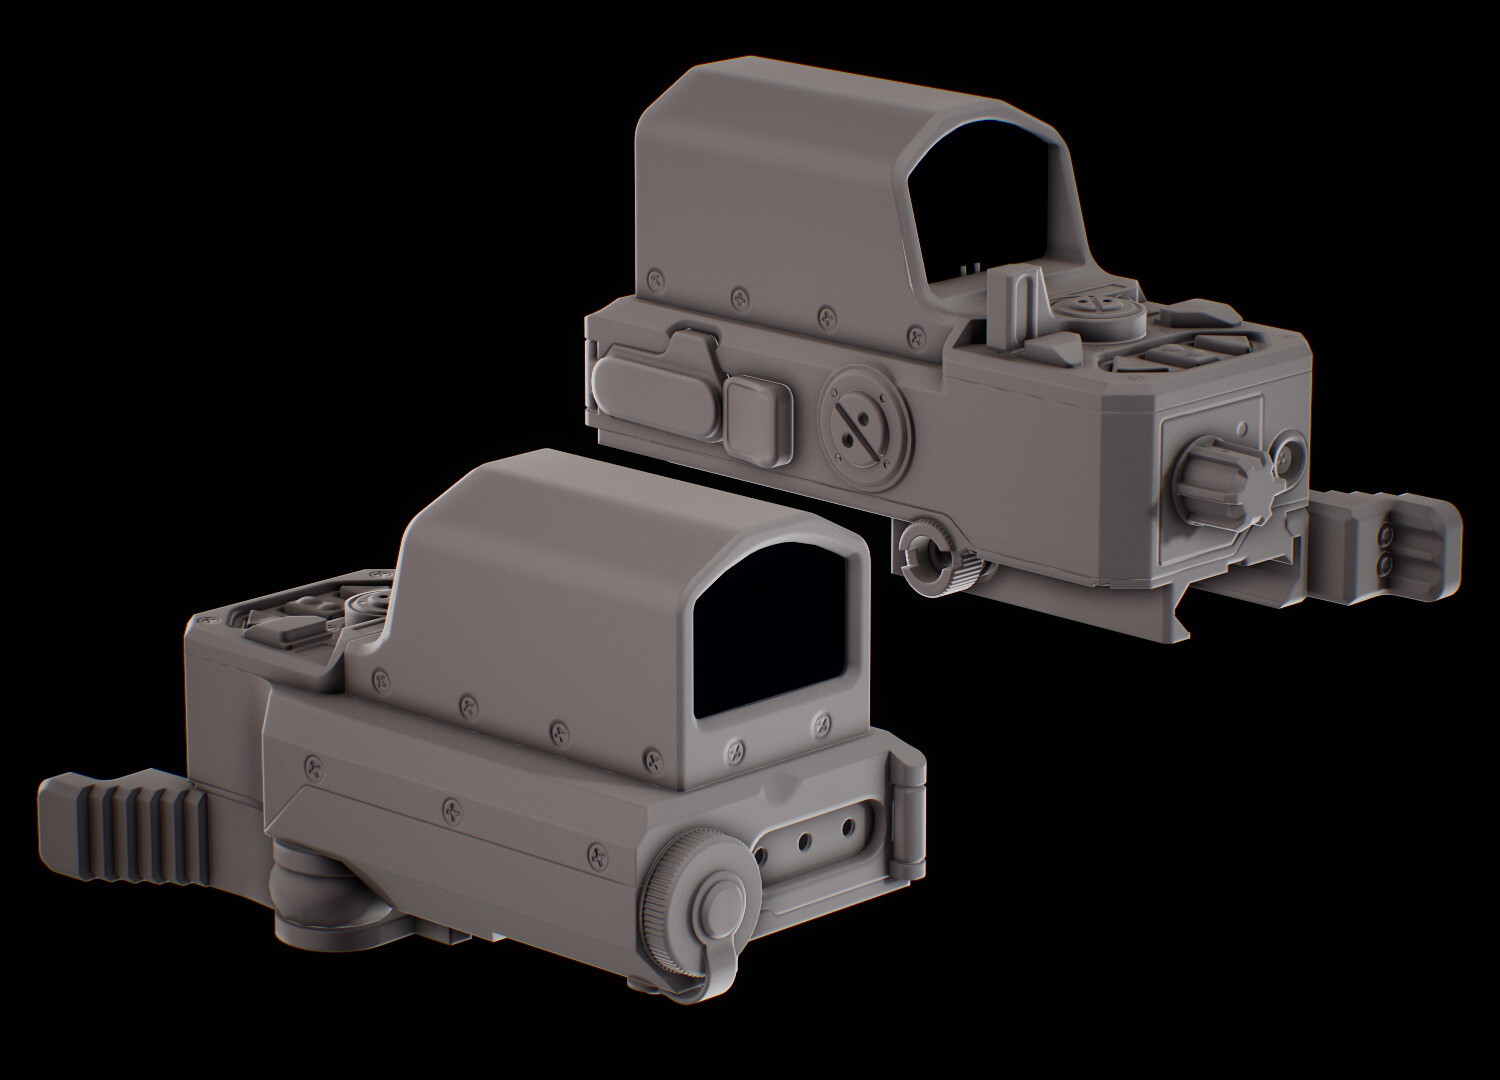
After all the playing around, we ended up with the result below - one of the cleanest high polys I've ever made, which I wouldn't have been able to achieve using my traditional toolset this quickly.
It's important to note that I teach my class every Wednesday and Friday, so I had to be quick on how I developed the piece, as this first part of the course, which focuses on the weapon attachment only, is meant to be taught from October to December, and that's for the whole process. This means I had 22 three hour classes, to develop this piece from high poly to texturing and presentation, but most importantly, make sure my students ended up with a similar asset with great quality. Not an easy task.
-----
Rounding the Edges - The Final High Poly.
Not every software is always available for educational purposes, and, as a professional, I couldn't expect the school to adapt to my needs to teach this course as best as I could. The reason for the line before is, I needed an in-between program to take my models from Fusion360 to Zbrush called "Moi3D."
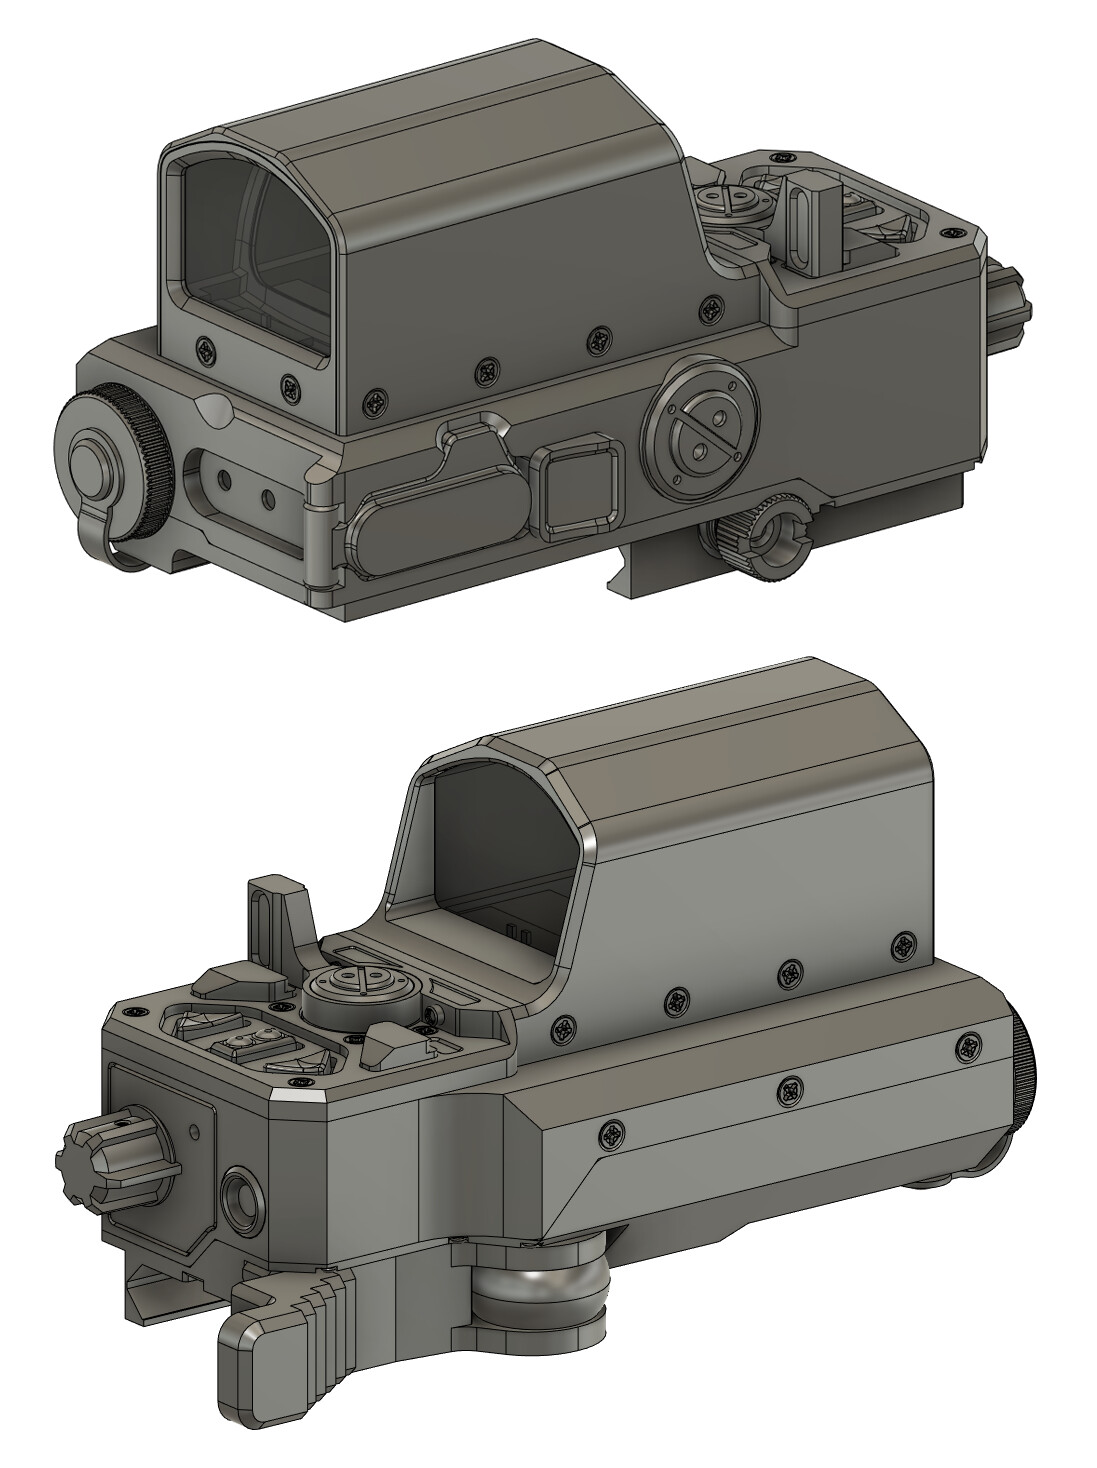
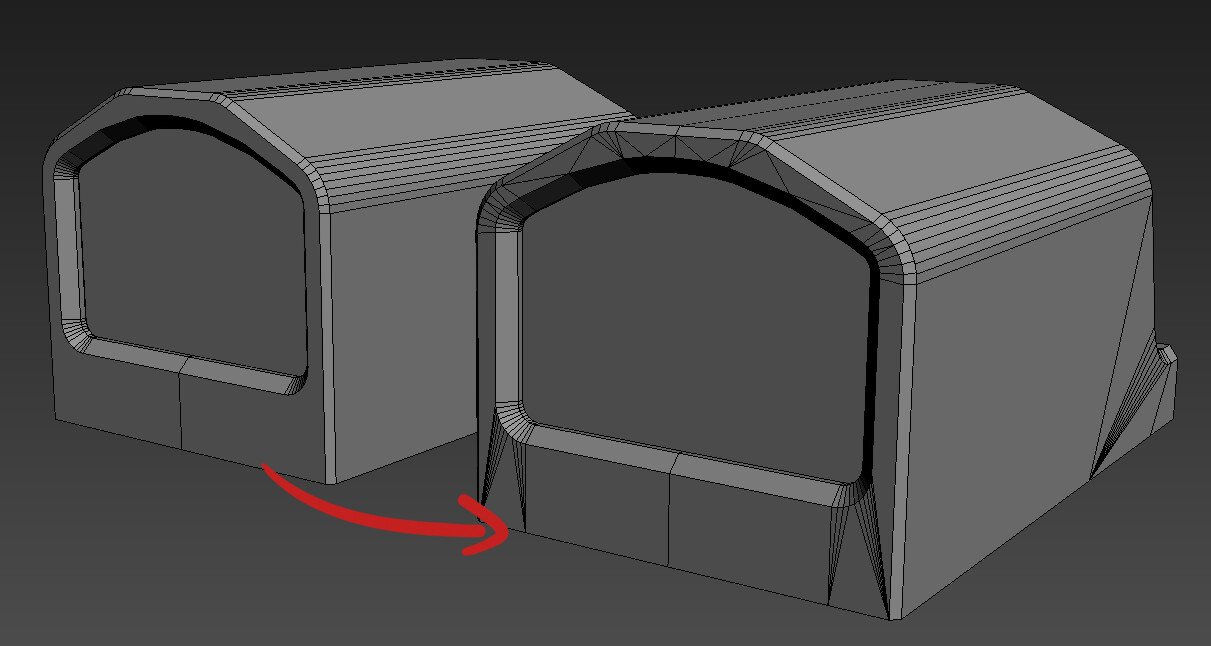
Moi is great at taking the solids created in Fusion and converting them to whatever mesh configuration suits you best, but, since I didn't have this available for me, I had to learn a way to export some reasonably dense meshes from Fusion so that I didn't end up with faceted results in Zbrush, since Zbrush won't care about your smoothed faces, and will calculate your Dynamesh only minding your geometry, giving you incorrect results for your high poly, as seen below.

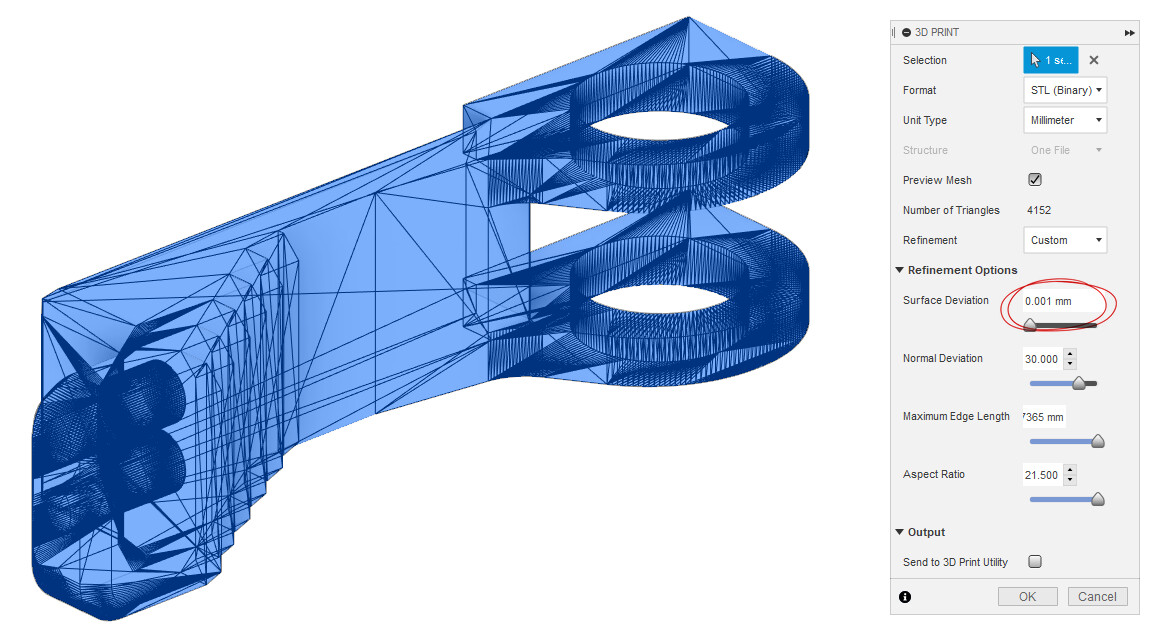
Without Moi, we had to be clever about this. Thankfully, Fusion allows for a higher subdivision count, although it's quite finicky and requires a fair amount of playing around, and some levels can break your model. Again, not as straightforward as Moi. The following export settings, plus some playing around in Zbrush, allowed us to get a great-looking high poly.
Time to put out the Zbrush bag of tricks. With this model in particular, the faceting isn't bad at all. It will be noticeable in the end result if the material applied to it is quite glossy tho, so we should always fix stuff like this. The following example has been exaggerated to better explain the process.
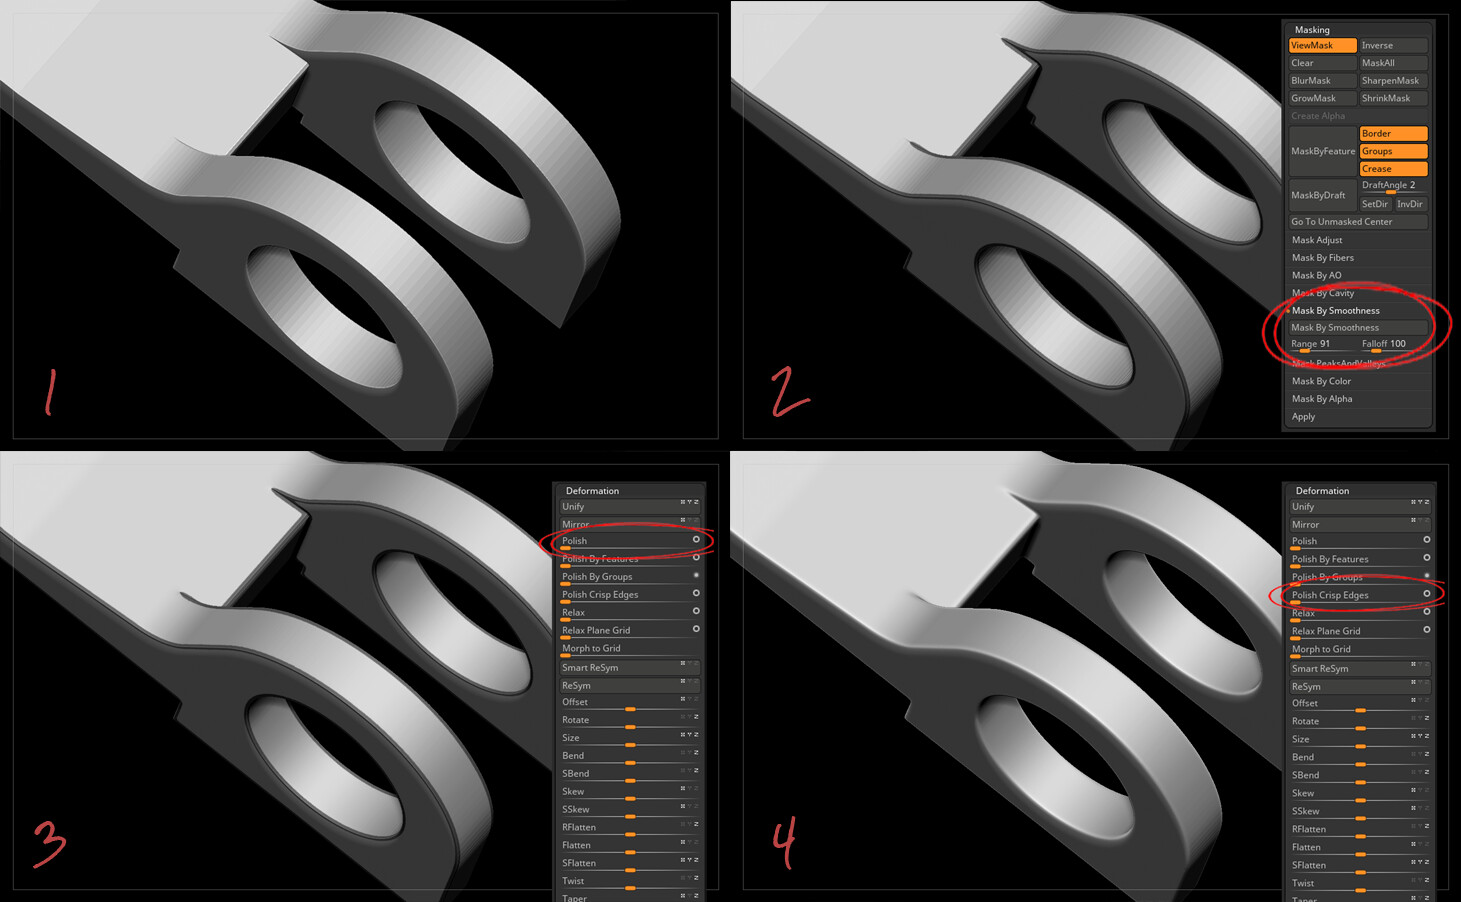
First, we Dynamesh, then mask by smoothness, which selects only the hardest edges, refine that mask with blurring and sharpening, polish the unmasked areas, unmask, and polish crisp edges on the whole object. This gives us a clean and smooth high poly.
As you can see, we were able to work around not having Moi for now, and we could end up with a fairly clean high poly. Zbrush is quite powerful when it comes to processing the geometry, and it wasn't like we had to make some crazy process to make this work for us. It is now that we are moving on to the low poly that we are going to suffer the consequences of not having the software.
-----
Time to Clean - Creating the Low Poly.
As I mentioned before, Moi3D wasn't installed in the school computers, so here's where we faced our first roadblock. Luckily for us, there's a great article here in Artstation Magazine on how to work with Fusion and Moi, which I was able to share with my students, which contains the following video explaining how you should export your models from Moi.
Here's a link to the aforementioned article.
Each student and I then used our own installations of Moi3D from home to generate our base for the low poly. From there, it was all just cleaning the model to obtain a good and clean game ready mesh.
I must admit I couldn't treat all the pieces in the model with all the love I would have liked to due to the considerable time constraints I was under. At the end of the day, I had to be very careful on where I spent the resources I had, keeping in mind my students were not starting this course with a zero knowledge base. Let's not forget this was an advanced course.
The next step was Smoothing Groups and UVs. It is incredibly important to get the first one right. Once we have good smoothing in our object, unwrapping is just a matter of a few clicks.
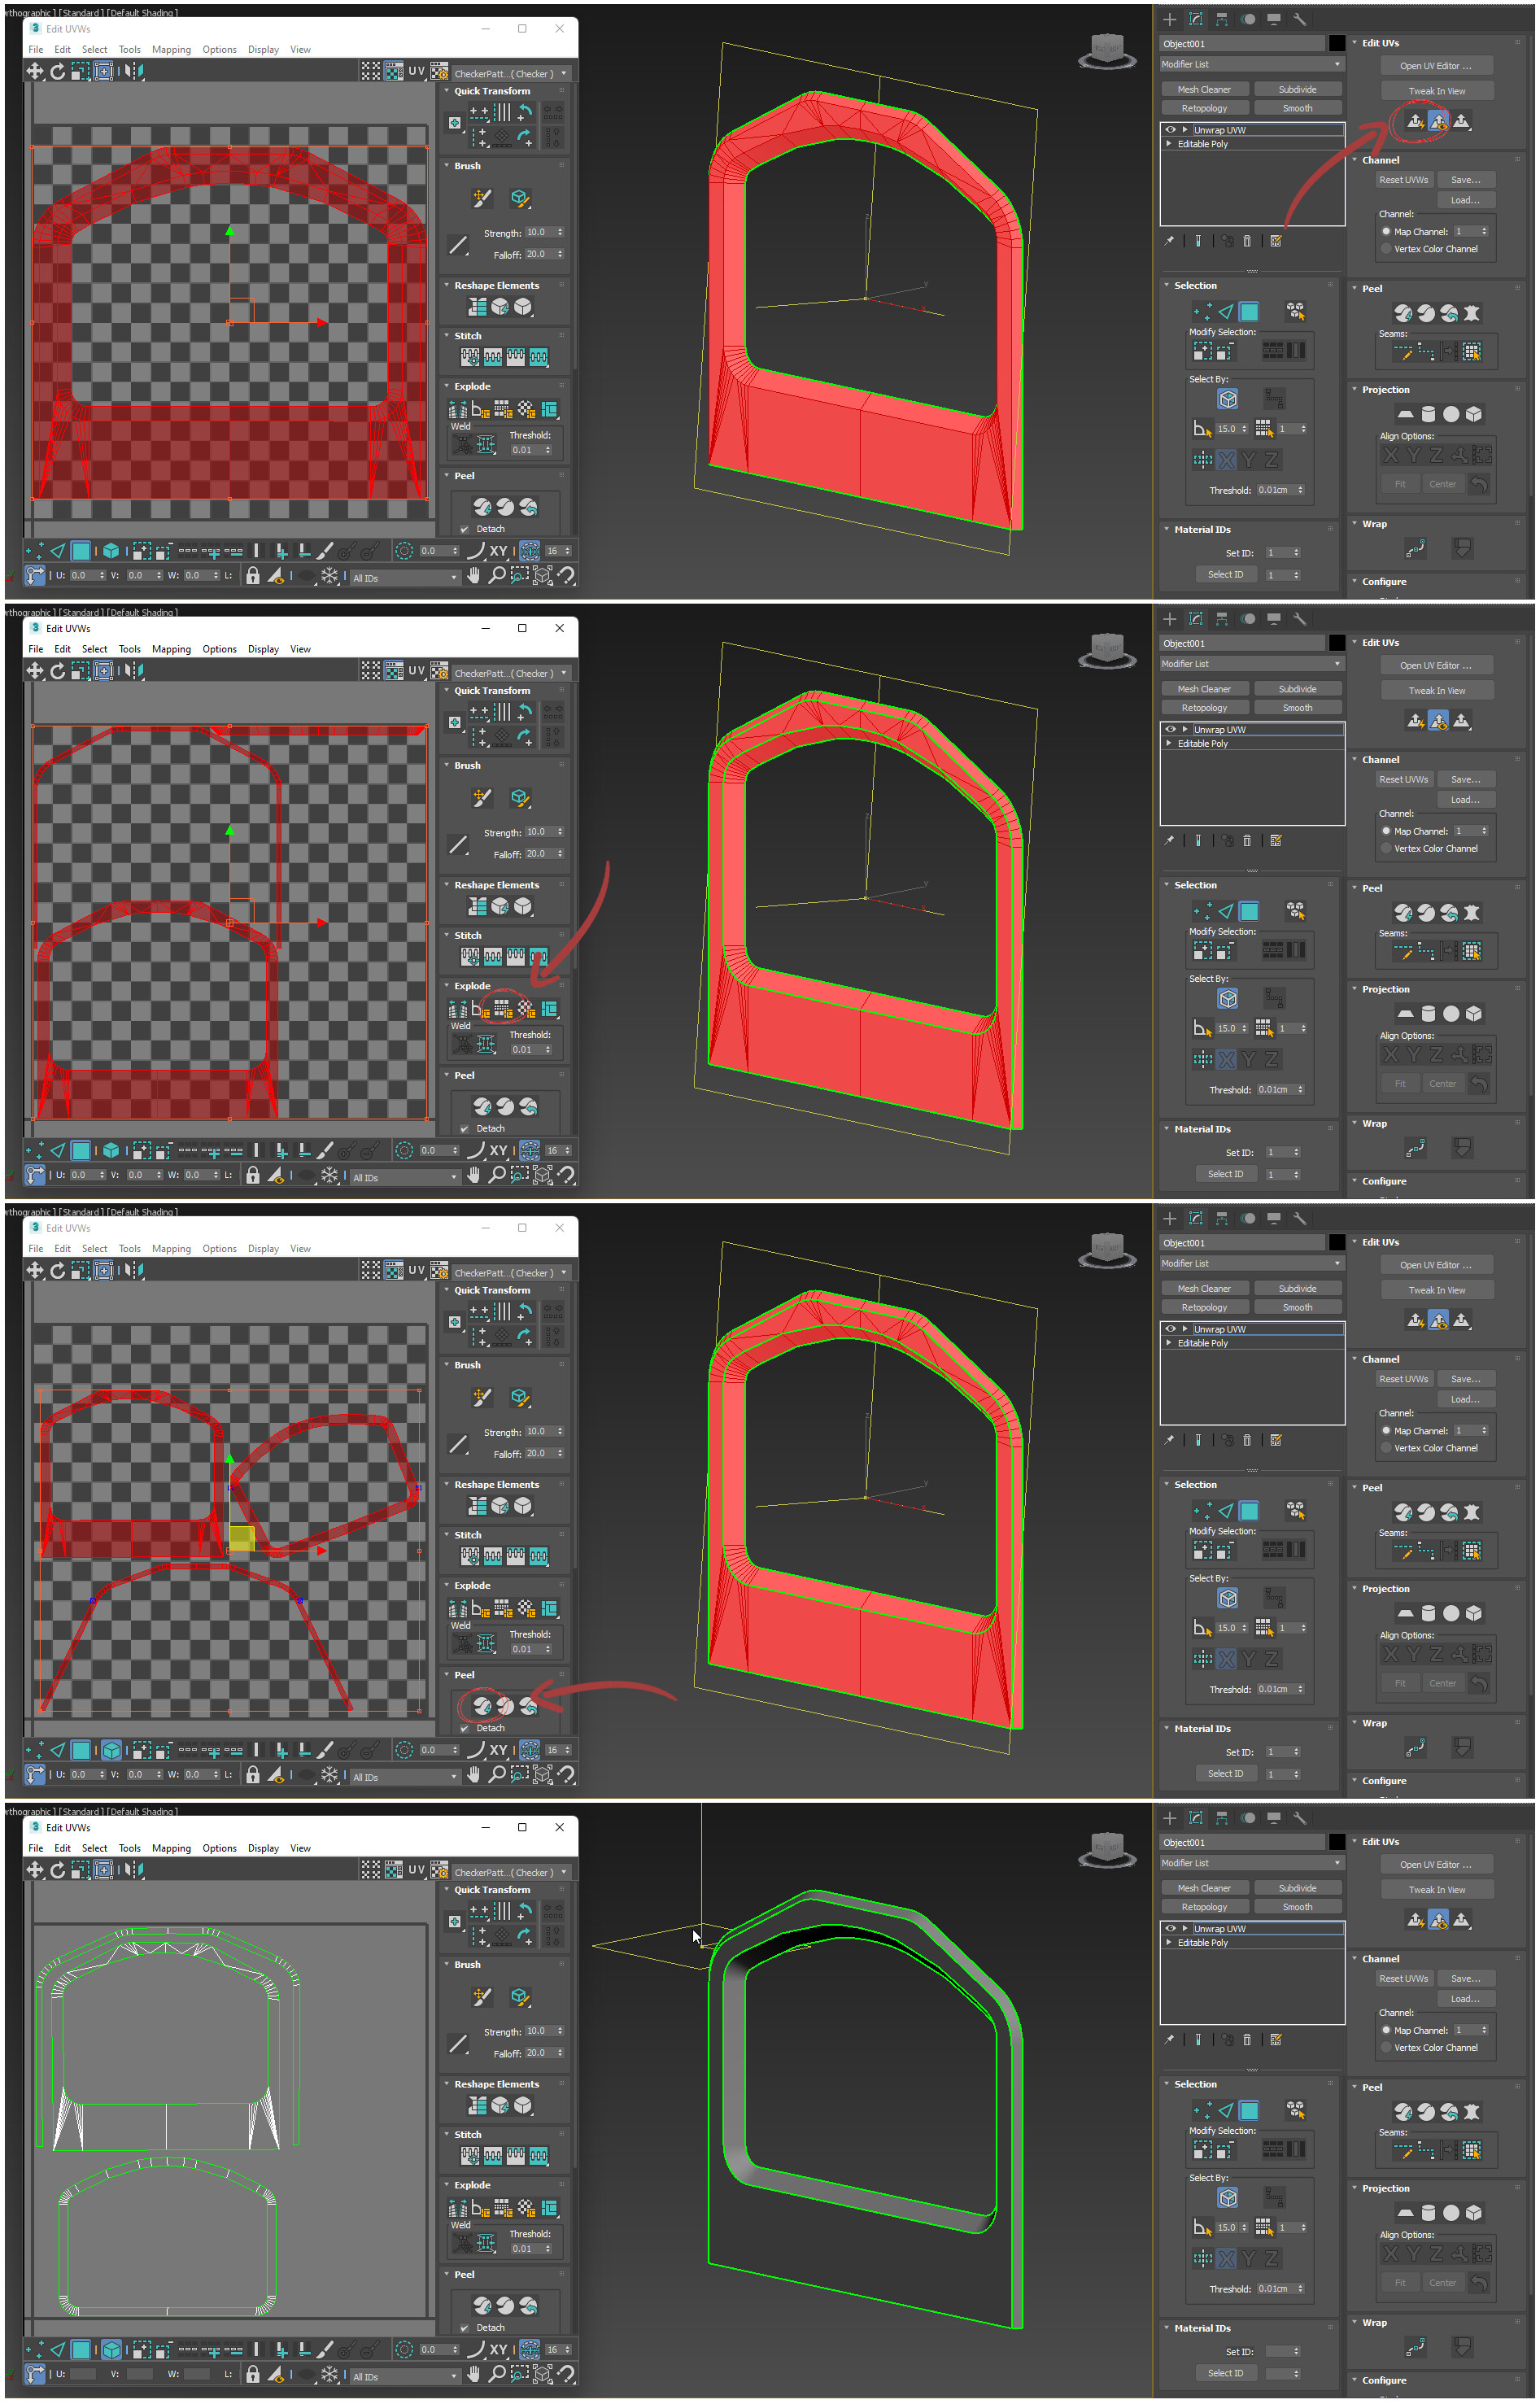
As you can see on the image above, I start with flattening all the UVs, then I break them by smoothing group, cut the necessary areas, relax them and organize them properly to complete the process. Pretty simple. Once I have done this for every piece of the model, all is left is to pack them by groups using RyzomUV, with one group per piece.
-----
Baking and Texturing - Back to the Standard Workflows.
What can I say about baking that hasn't already been said? Not much. For getting some great results in our normals, we adhered to the basic rules of baking that I described in this article. Again, nothing fancy here, just exploding all the pieces and baking them ensuring no skewing was present in any of the baked details like screws or holes.
Reflected on the image above is the result, very clean thanks to the caring put into the setup (UVs and Smoothing Groups). It is now time to move on to substance painter, where I use alphas and stencils to detail the bake with any minor elements that were either too time-consuming to model and bake, or were just easier to add in the texturing process using the techniques I mentioned before. In this case, it isn't much, but it really helps to sell the object overall.

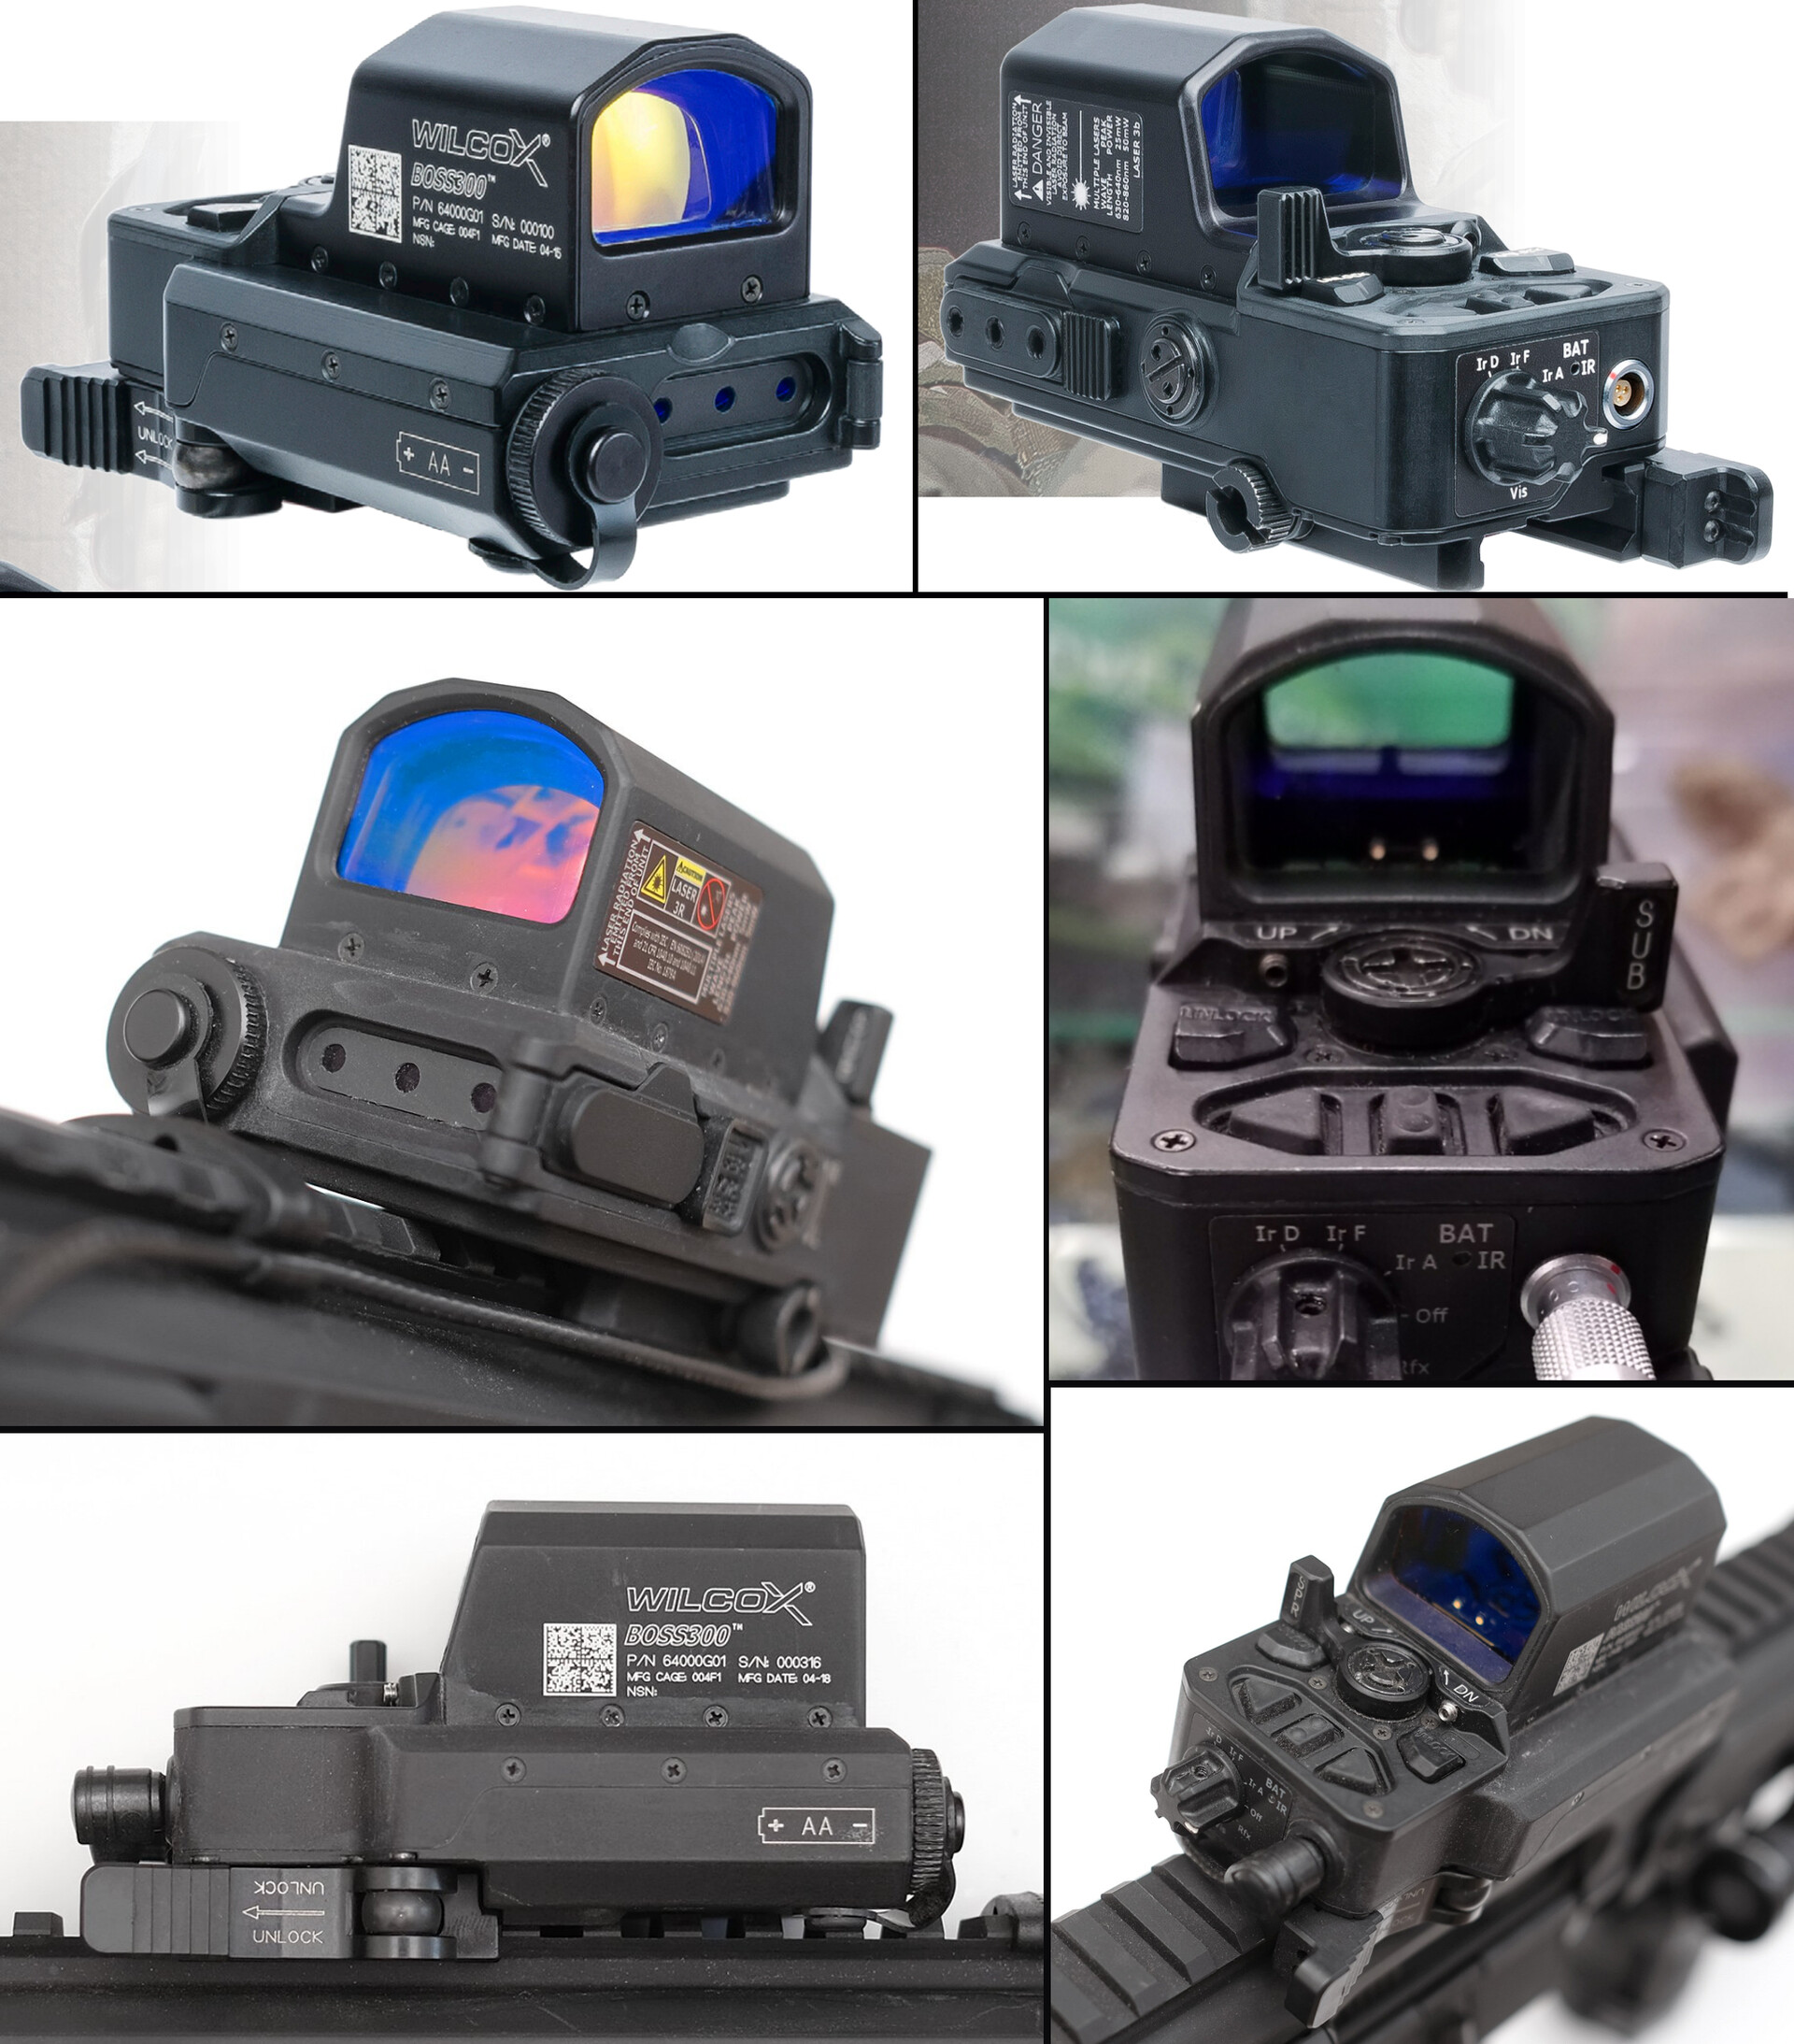
My texturing process is quite standard. I build layers of base materials that just work well with each other. I look for contrast in their roughness without adding too much noise and play with the color variations of the objects. I really don't think it is necessary for this breakdown to explain my thought process behind every decision I made for the texturing of this object, but I think it is important to emphasize that my main priority for this one was to somewhat replicate my texturing references.
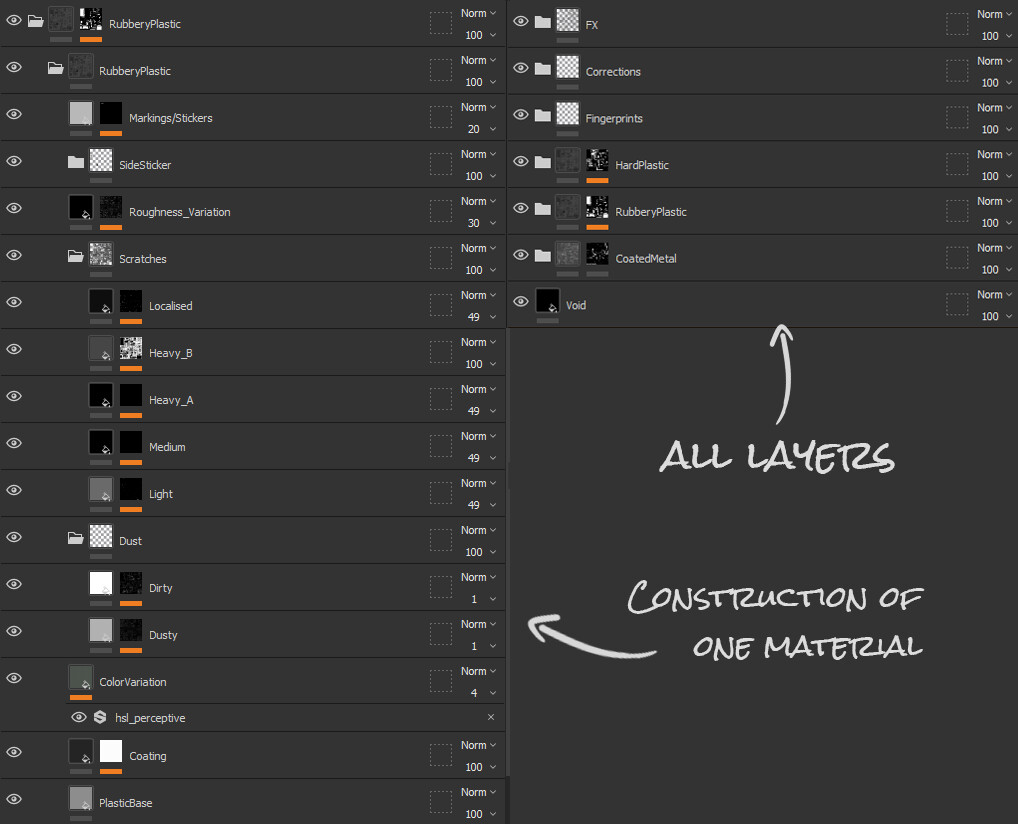
It is important to follow some sort of scheme when organizing your layers and materials within Substance Painter. I tend to follow one rule - making sure my document will be easy to understand by someone who might have to pick it up after me. Here's an example of my layers, their naming, and their arrangement.
If you want to know more about the techniques I use to texture, there are two tutorials I can thoroughly recommend you watch. The first one is Substance Painter: Pushing Your Texturing Further by Jason Ord. The second one by Duard Mostert is his AAA Game Assets with Fusion 360 tutorial. They both deserve a watch, trust me!
Ultimately, when all was completed, it was time for the presentation. Nothing too fancy here either, just my regular thought process stated in the following article I wrote a while ago; Exploring Presentations - My Thought Processes when Creating a Good-Looking Render. In my opinion, lighting is one of those things that requires a well trained eye and many hours of practice, which is why I won't be able to give you very precise key points to achieve great looking shots, but some basic guidance on what to look for in your renders.
In the end, a nice piece emerged from what was originally a bit of a gray area for me. I took the risk of jumping into Fusion360 in front of all my students and ended up with a piece that I'm incredibly proud of.
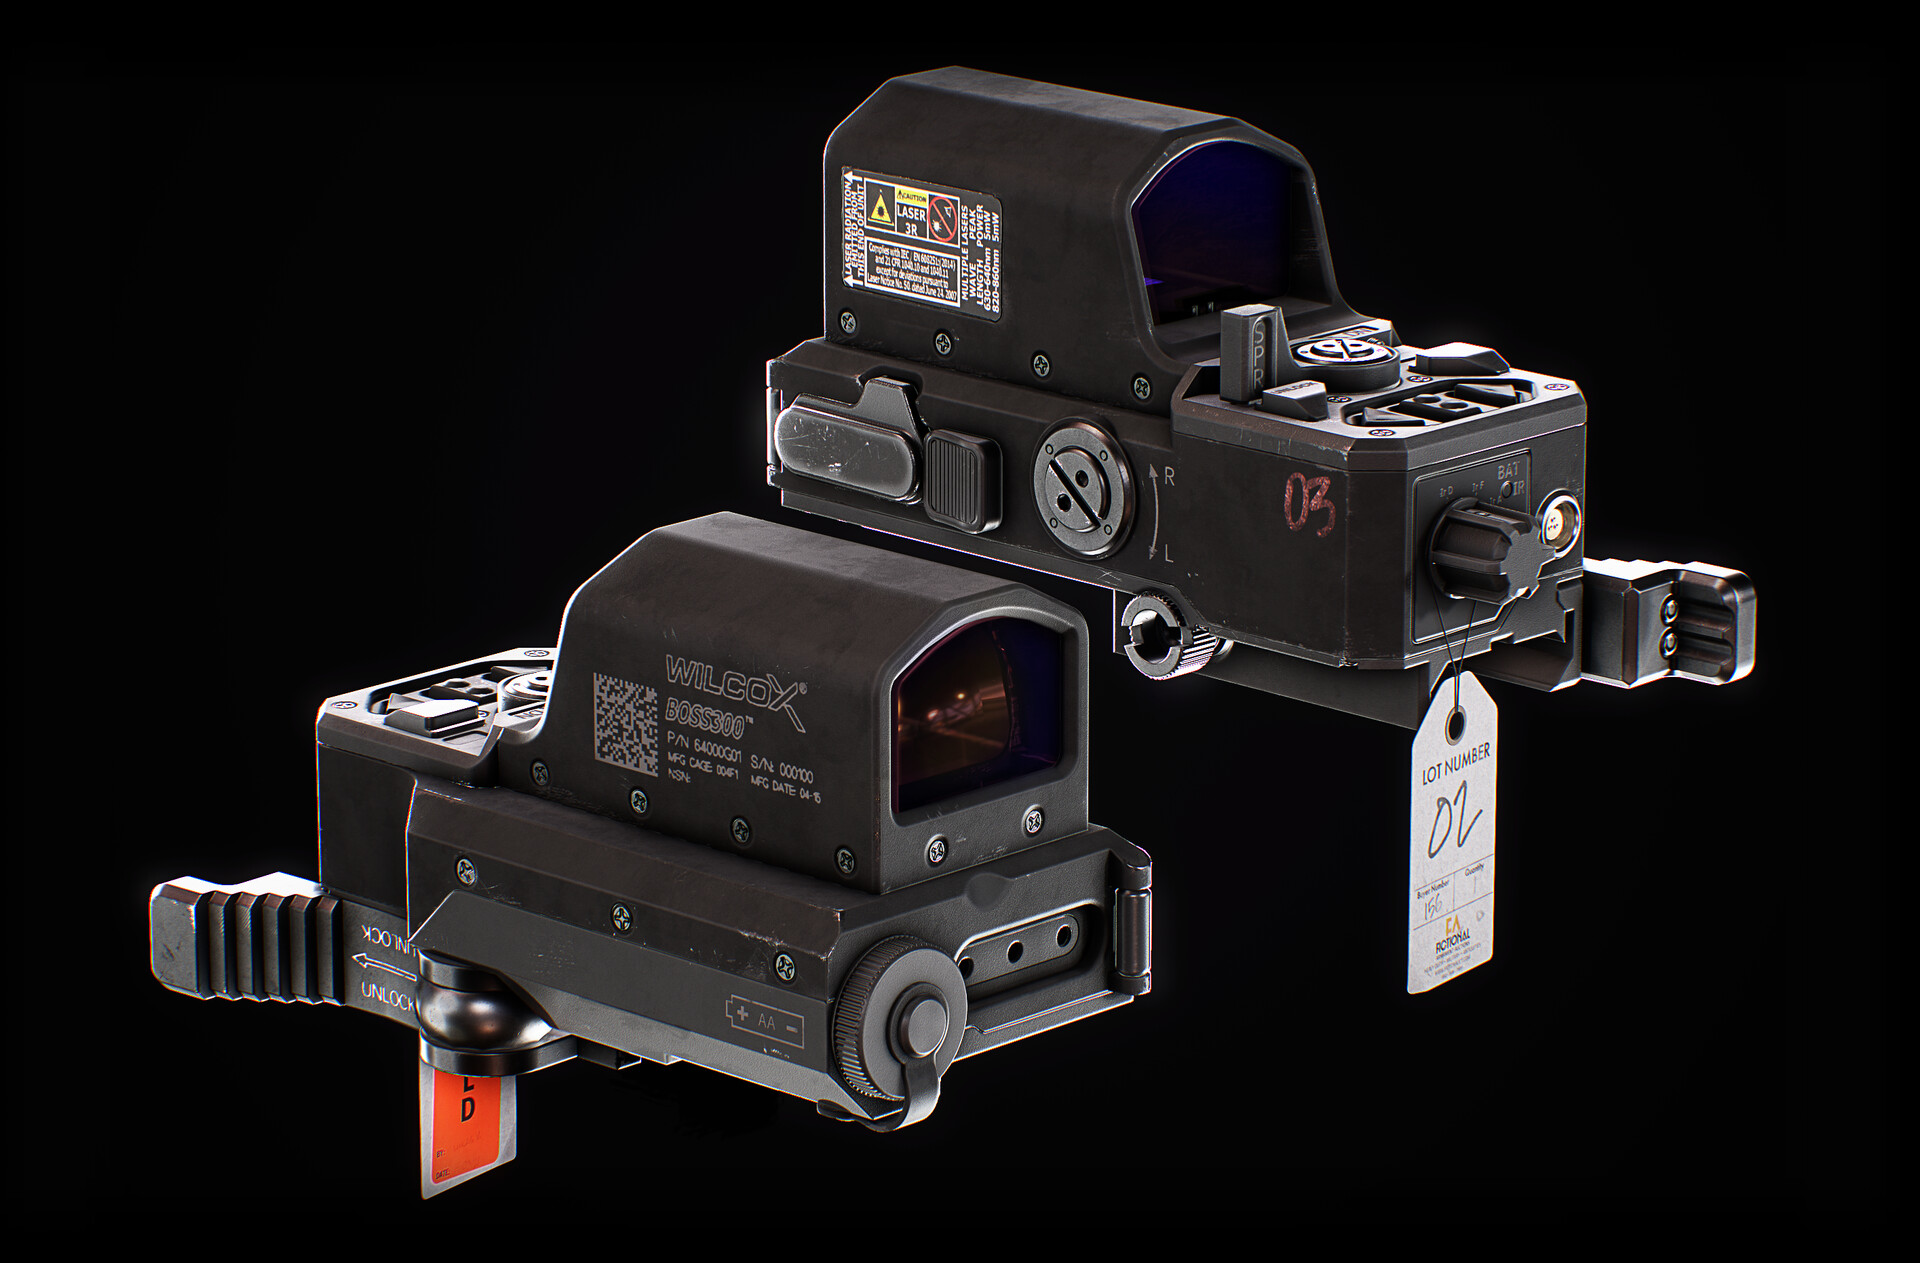
If you want to see more shots, feel free to check the artwork's page. It is now time to say goodbye for now, thank you for reading, and feel free to leave a comment below with your thoughts or questions!